このスライドは、新谷がマレーシア Malaya university において2018年7月8日に講演したものです。
参考になさってください。
Thank you, chairman. My name is Satoru Shintani. I am a owner of private dental clinic in Tokyo, Japan.
I appreciate your invitation and honored to do a lecture in Malaysia today.
Now I start my lecture.
Is Guided Surgery just an option for implant treatment?
No! It is a standard protocol.~ Introducing FINESIA iDS, a new concept to realize digital end-to-end process ~
My implant treatment in 1998 (Okayama Univ. JAPAN)
In 1998, my implant surgery was started without Surgical Guide because it was not available at that time.
I cannot remember how I did these surgeries. But now, I have no confidence doing the surgeries without Surgical Guide.
Implant treatment in 1980~1990s
This is the implant treatment in 1980’s to 1990’s. Without Surgical Guide, I cannot imagine how long this patient had to put up with the operation.
Computer Guided Implant
Computer Guided Surgery is one of the biggest revolutions in recent implant treatment.
Doctors do not need to think about position and direction of implant during operation.
It’s just like a Shape block Puzzle.
Computer Guided Implant (Tekishin, Kyocera) from 2014 Tokyo Ginza Shintani DOMFS Clinic
In Computer Guided Surgeries, I fix the Guide to the teeth and just drill along the guide holes.
Computer Guided Implant (Tekishin, Kyocera) from 2014 Tokyo Ginza Shintani DOMFS Clinic
After the drilling, insert implants also along the guide holes.
Surgeries take only about 10 minutes. I get lots of comments from my patients that Implant surgery was less stress than tooth extraction.
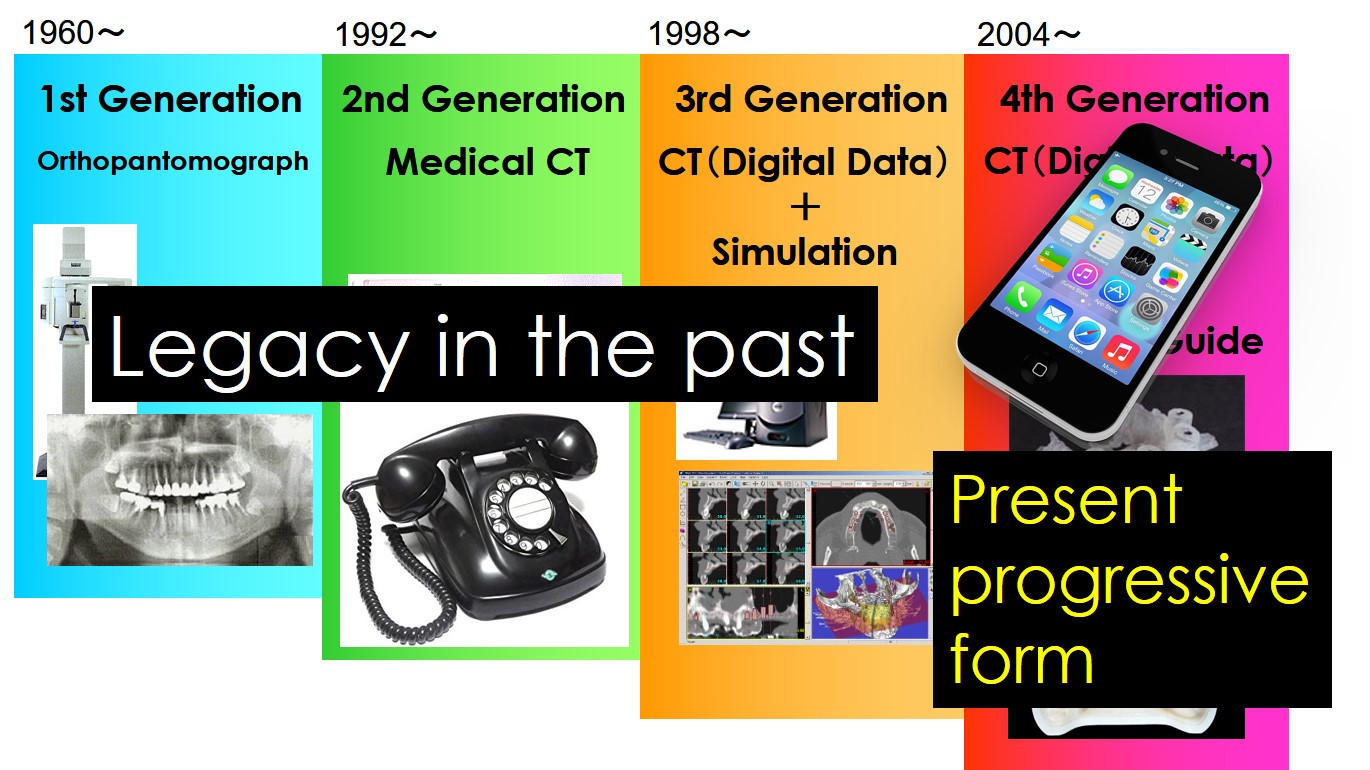
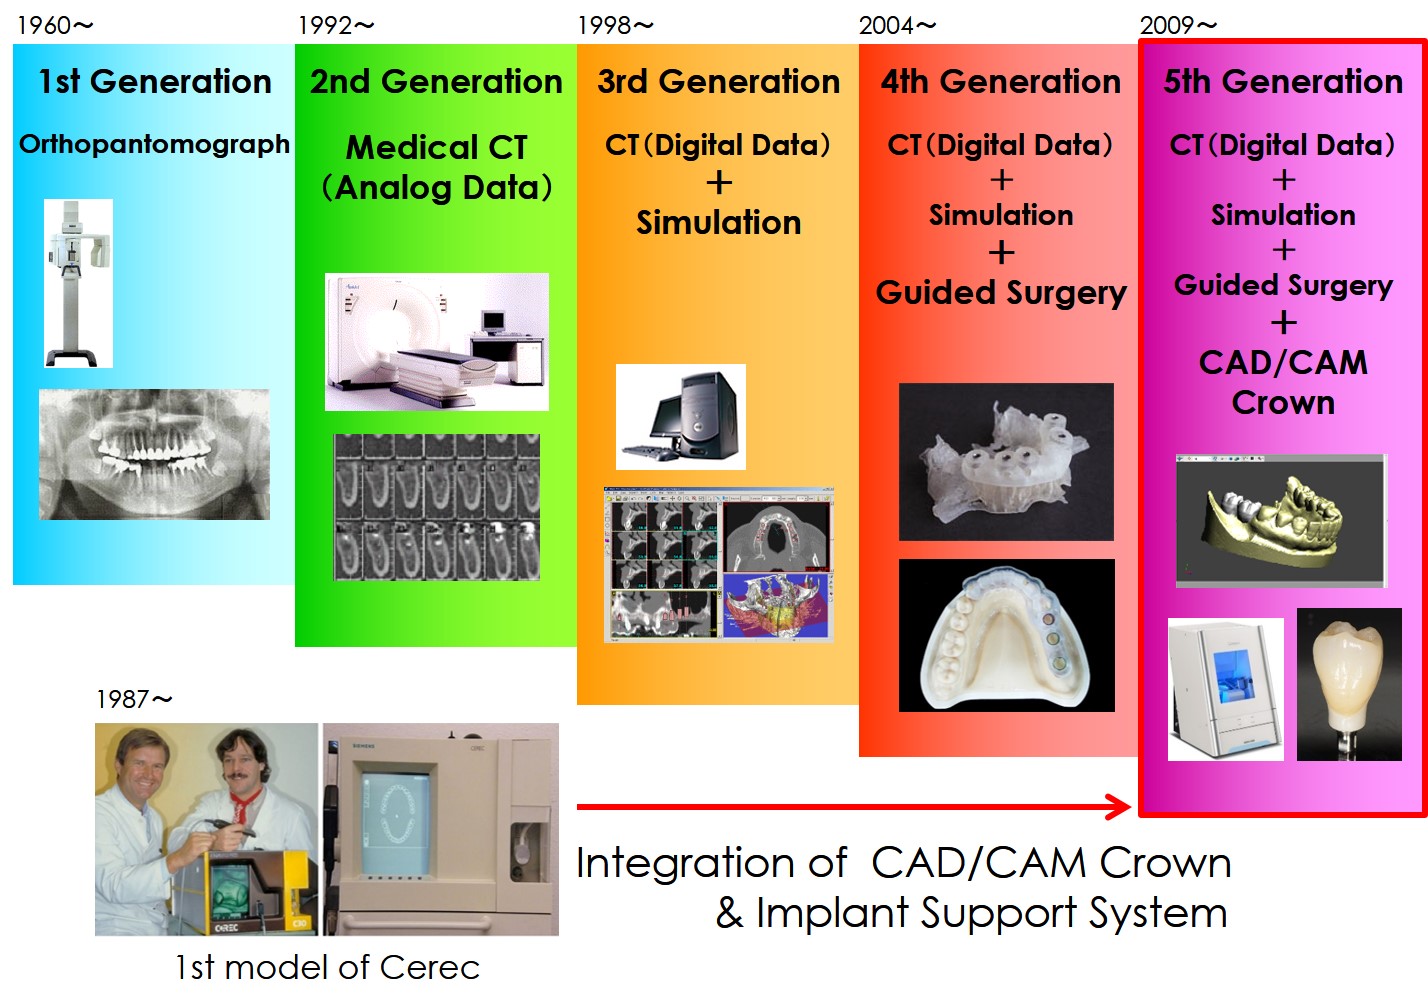
Changes in Diagnosis and Operation method for implant Surgery
So, I would like to explain about Changes in Diagnosis and Operation method for implant Surgery
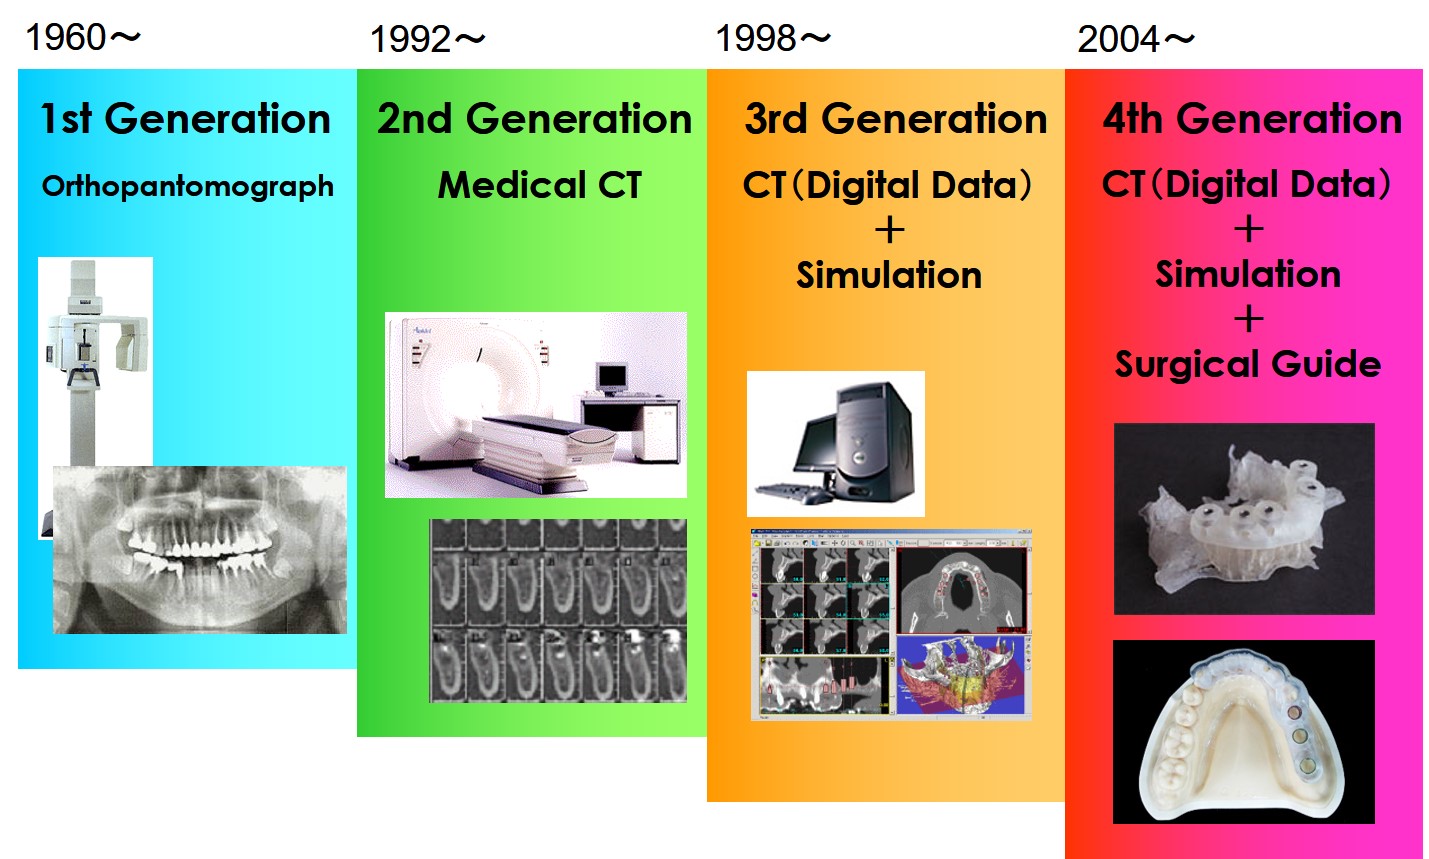
In the beginning, called 1st generation, we only had orthopantomograph to diagnose and plan implant surgery.
At that time, we traced and drew the shape of implant on tracing paper. That was all. Just did the surgery. What a terrible procedure!
From 1992, the risk of operation without CT scanning data was getting more recognized. So some of the dentists started using medical CT. But the data was only on film.
From 1998, CT image were digitalized and also with the evolution of personal computers, some of the dentists started using implant simulation software. Then, diagnosis became more accurate but there was no way to reflect in surgeries.
Finally, from 2004, we got the excellent device, Surgical Guide! By using this, accurate diagnosis reflected in surgeries and surgeries became more accurate.
Why is proper implant position, depth and direction important??
Improper implant position makes patient unhappy…
why do you think proper implant position, depth and direction are so important?
Because improper implant position makes patient unhappy.

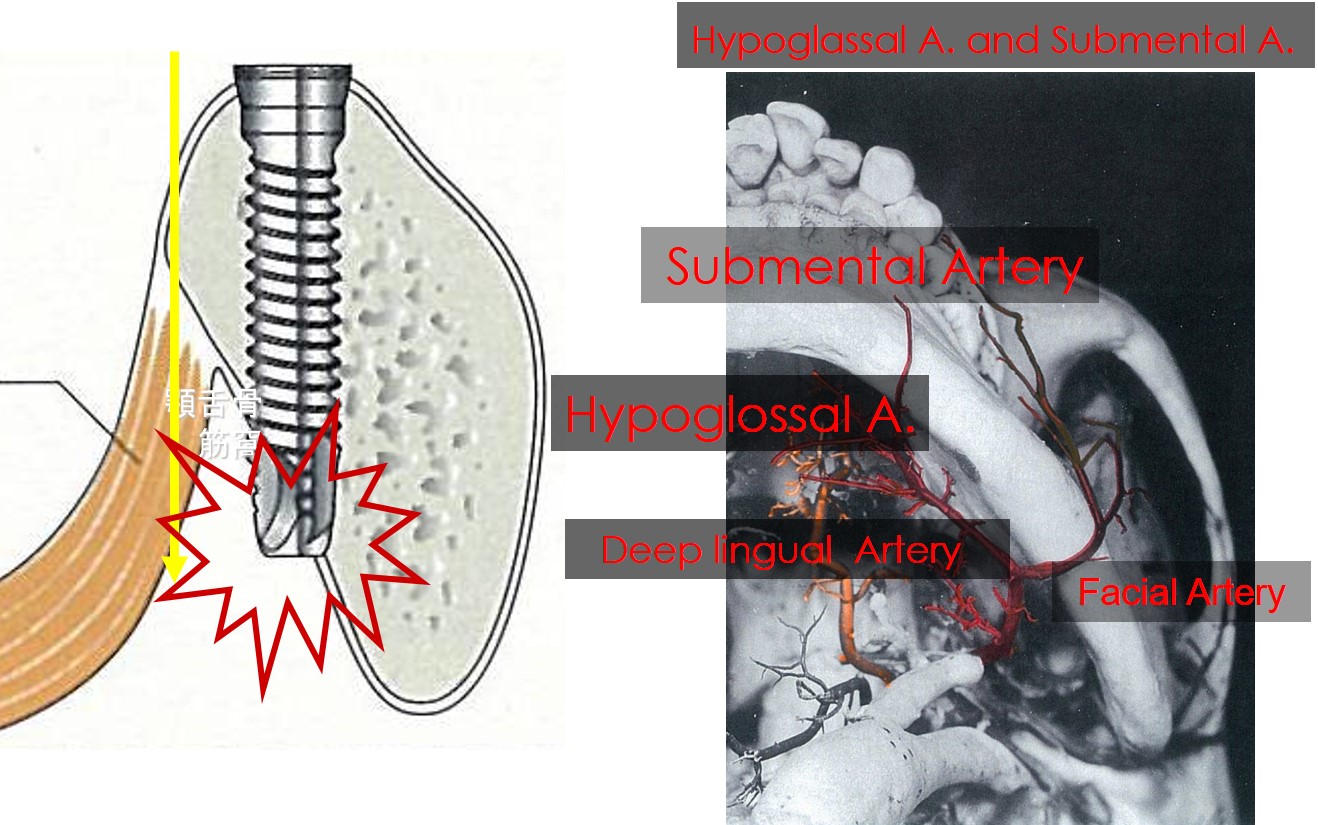
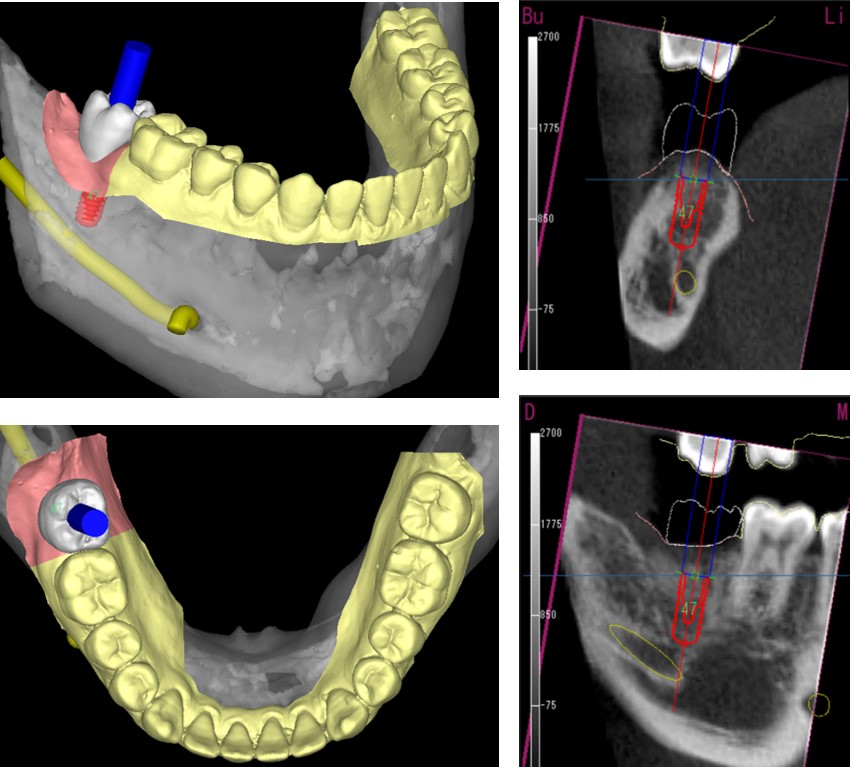
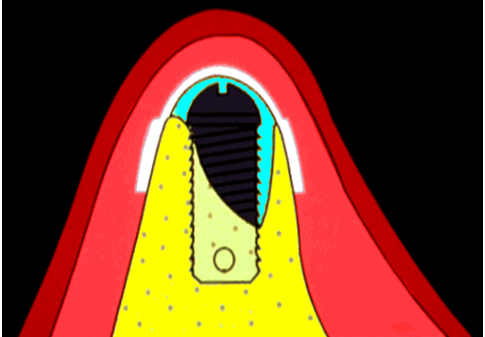
Shape of bone and location of mandibular canal have variations.
CT scan image is useful for diagnosis.

Whenever you place implant on molars on mandible, you must always remember that shape of bone and location of mandibular canal have variations. If the implant hits the mandible canal, it can cause neuroparalysis at mental region.
If the implant perforate the edge of mandibule, mouth floor bleeding
will occur, and the patientt may die.
In fact, a patient died in Japan after implant surgery and the dentist was found guilty.
Most Dangerous Accident in Implant Surgery
Is it hard to believe patients can die after implant surgery? The answer is yes.
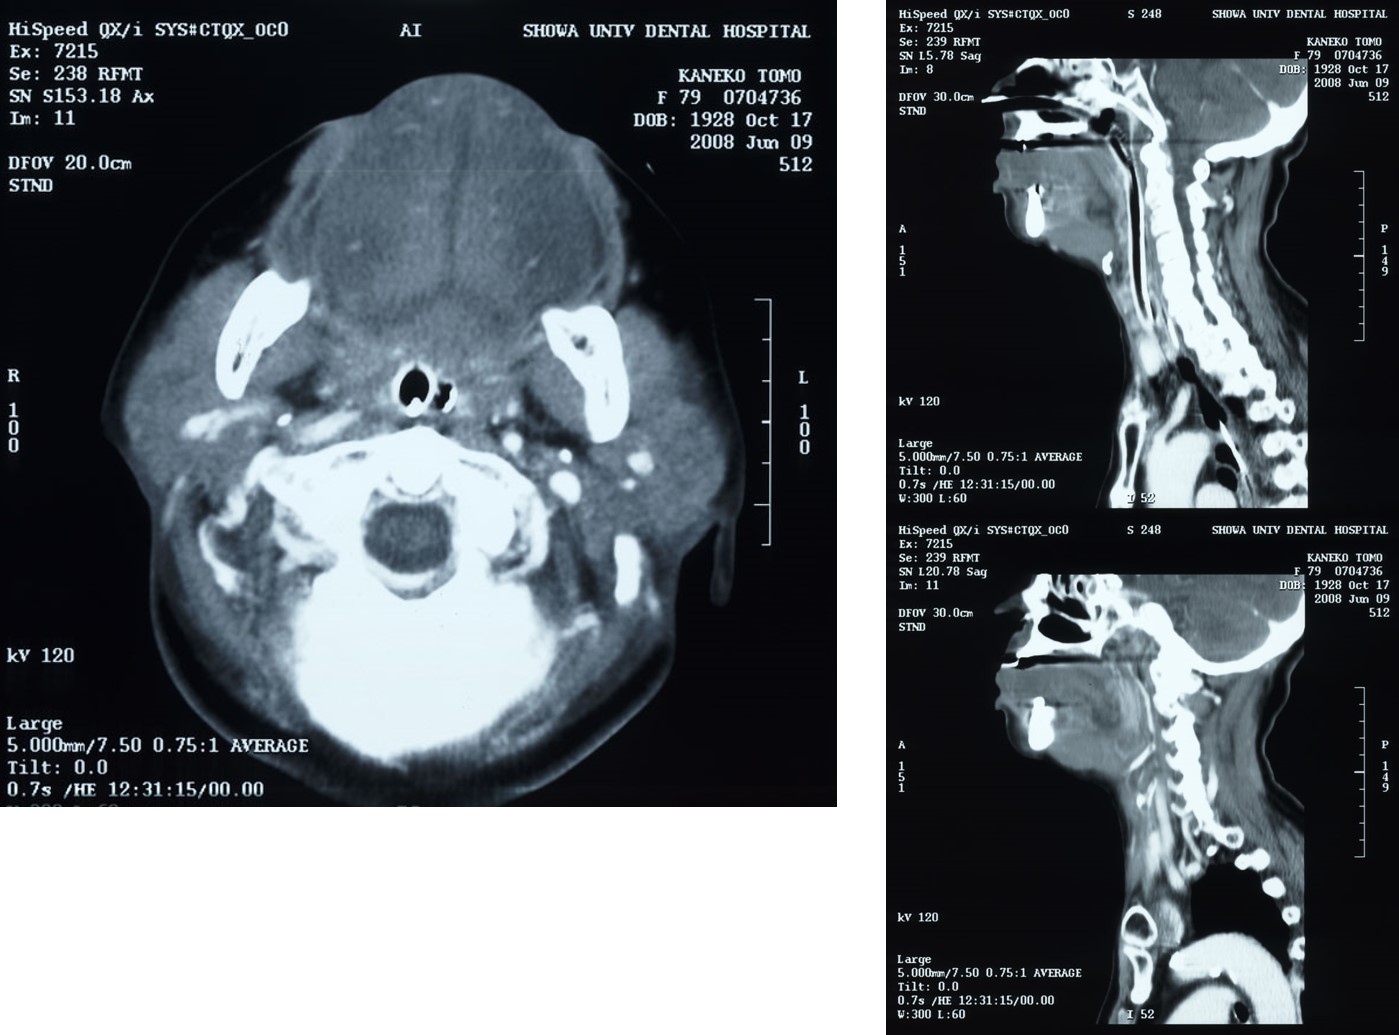
Near the bottom and inner edge of mandible, there are many important blood vassals like Hypoglossal artery, Deep lingual artery, Facial artery etc.
What happened ?
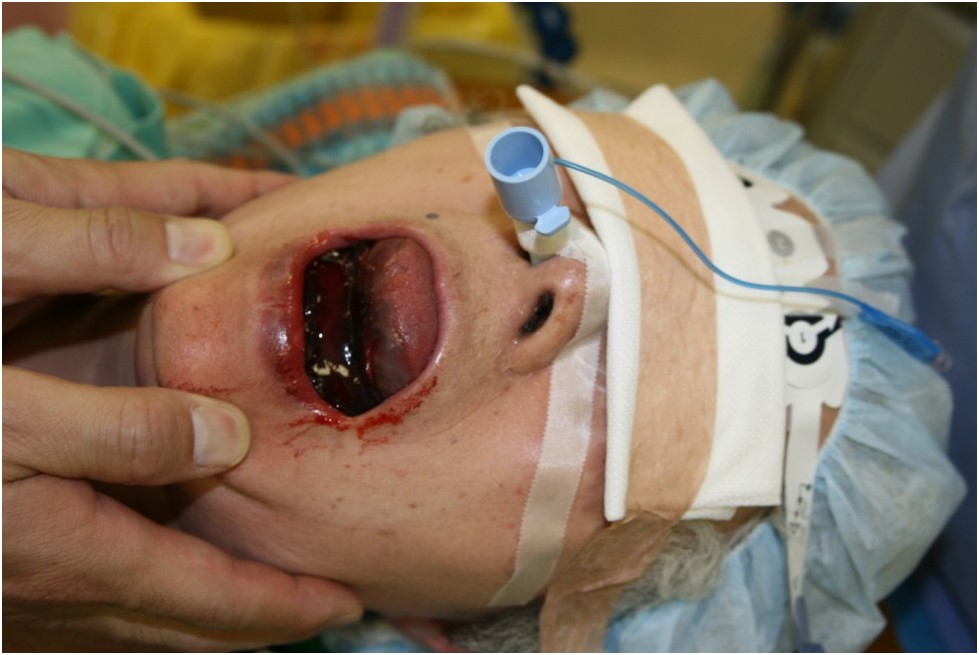
This case was what we experienced in 2009. This patient had an implant surgery and 1 hour later, she was brought to our hospital with her mouth floor lifted with bleeding. She could not breath and her face was pale. Emergency intubation was done and it saved her. You can see the mouth floor is lifted with blood clot.
What happened ?
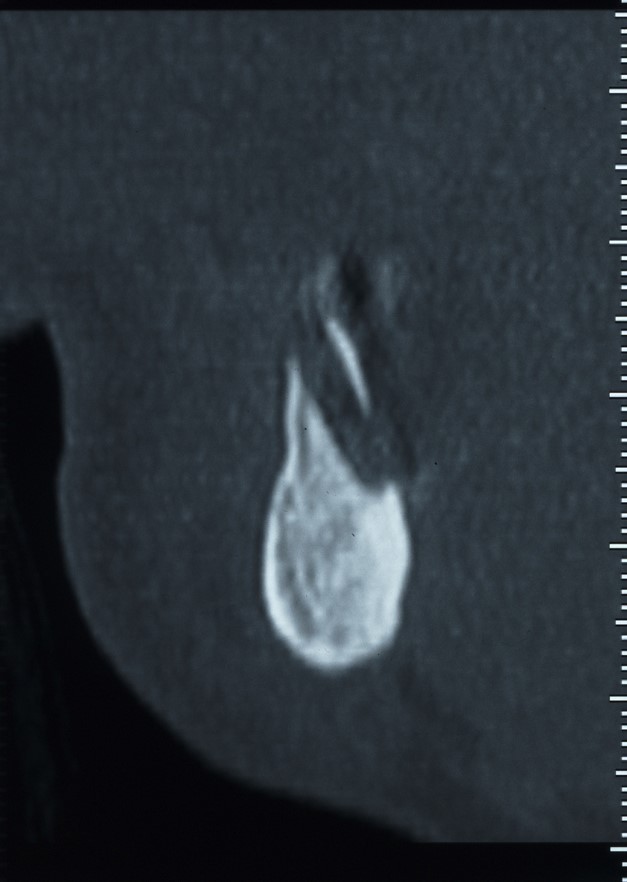
CT image revealed that the drilling direction was improper and it perforated the cortical bone and reached the mouth floor.
What happened ?
Even after swelling of muth floor went down, the patient was under intubation for 8 days.
What if emergency intubation was failed?
I do not want to imagine.
The Most Popular failed cause of implant treatment is Peri-implantisis
Peri-implantisis
⇒ Patient‘s brushing, Oral care is bad
⇒ The implant position and Surrounding status is difficult for care

I would like to talk about the most popular cause of a failure of implant treatment. Peri-implantitis.
When Peri-implantitis occurs, doctors may want to think it is patient’s fault for wrong brushing or poor oral care.
On the other hand, patient complain that the implant position and direction were wrong so cannot take care of it properly.
Which implant will be functioning longer?
Which implant will be easier to care?
Past and Current Status in JAPAN
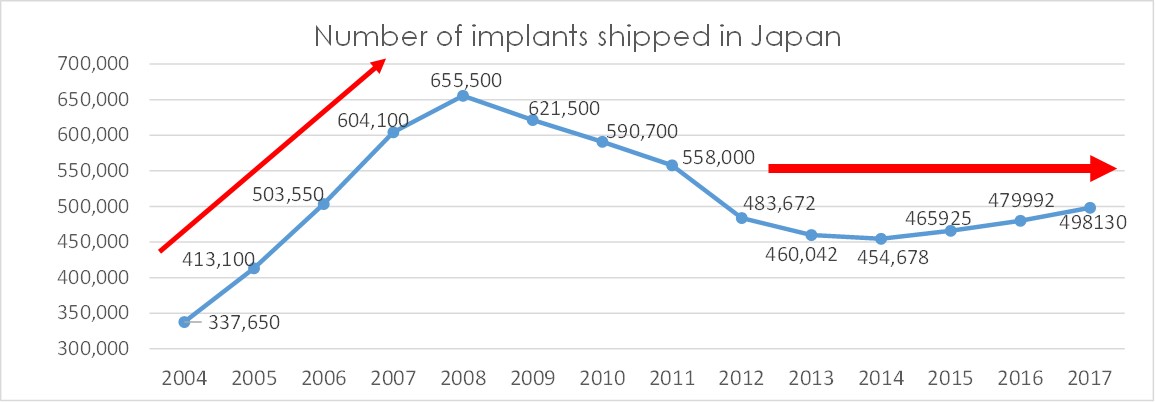
12~13 years ago (2005~6)
# Number of Implant treatment increasing and spreading
# Dental CBCT was so expensive (over 270,000 US$)
# Limited Dr. refer CT data (mainly Medical CT)
# Limited Dr. use Surgical Guide
Present (2018)
# Number of Implant treatment almost flat
# Dental CBCT become popular (under 80,000 US$)
# Many Dr. refer CT data (mainly Dental CBCT)
# Many Dr. use Surgical Guide
12 years ago, Implant treatment increasing and spreading but dental CBCT was so expensive. Only limited number of Dr. referred to CT data and the number of Dr. used Surgical Guide was also limited.
At present, Number of Implant treatment almost flat, Dental CBCT become popular, many Dr. refer to CT data (mainly Dental CBCT) and many Dr. use Surgical Guide
But not all dentist do implant surgery with Surgical Guide. Why???
Their Opinions
- Simulation Software is Expensive…
- Surgical Guide Kit is Expensive…
- Surgical Guide is Expensive…
- My clinic does not have CT…
- Patients do not want to pay additional fee, and They will choose cheaper clinic…
When you do operation to your family, will you do implant surgery without Surgical Guide for such reasons?
So, why still now, not all dentist do implant surgery with Surgical Guide?
Their opinions are
Simulation Software is Expensive
Surgical Guide Kit is Expensive
Surgical Guide is Expensive
My clinic does not have CT
Patients do not want to pay additional fee, and They will choose cheaper clinic
When you do operation to your family, will you do implant surgery without Surgical Guide for such reasons?
When you treat patients, what do you hope?
⇒ I hope my patients enjoy their eating, drinking, smiling and having conversation with my treated tooth.
When you perform implant surgery, what do you hope?
⇒ I hope that surgery will be performed, safe, non-invasive, no-stress.
⇒ When I finish the surgery, I hope not to worry about the position of implant and prognosis.
⇒ I absolutely hope to avoid severe risk which leads to paresthesia and bleeding with severe problem, such as fatal accident.
When you perform implant prosthesis, what do you hope?
⇒ I hope implant prosthesis to be loaded as scheduled.
⇒ I hope bite force to implant is proper and super structure shape has good cleanability
⇒ I hope not to worry about the risk of abutment and/or implant body exposure in the future.
That incident will erase patient’s smile.

So, Why not do implant surgery with Surgical Guide
Many tools and devices for implant diagnosis and surgery have been developed over the last decades. So now, why not use surgical guide for implant surgery?
Guided Surgery (iCAT, FAINSIA 的心) vs Free hand (simplified guide)
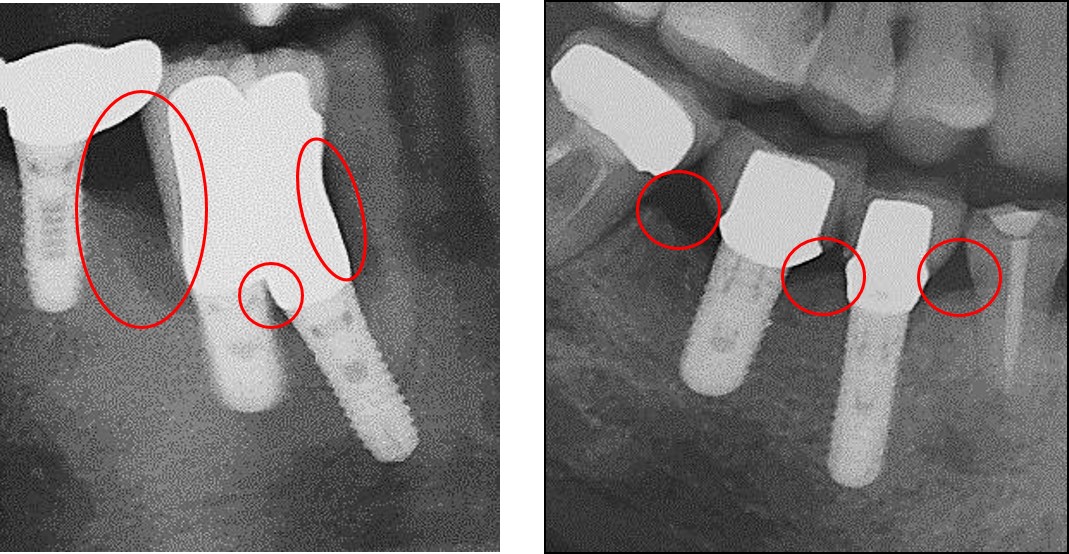
Accident Error of Implant Position, Depth, Direction
Method: 20 implant surgeon insert implant with and without 的心Guide

Let me introduce an experiment I conducted, Guided Surgery (iCAT-FAINSIA Tekishin)vs Freehand (simplified guide) to see Accident Error of Implant Position, Depth and Direction 20 implant surgeons inserted implant on mannequins with and without Tekishin Guide
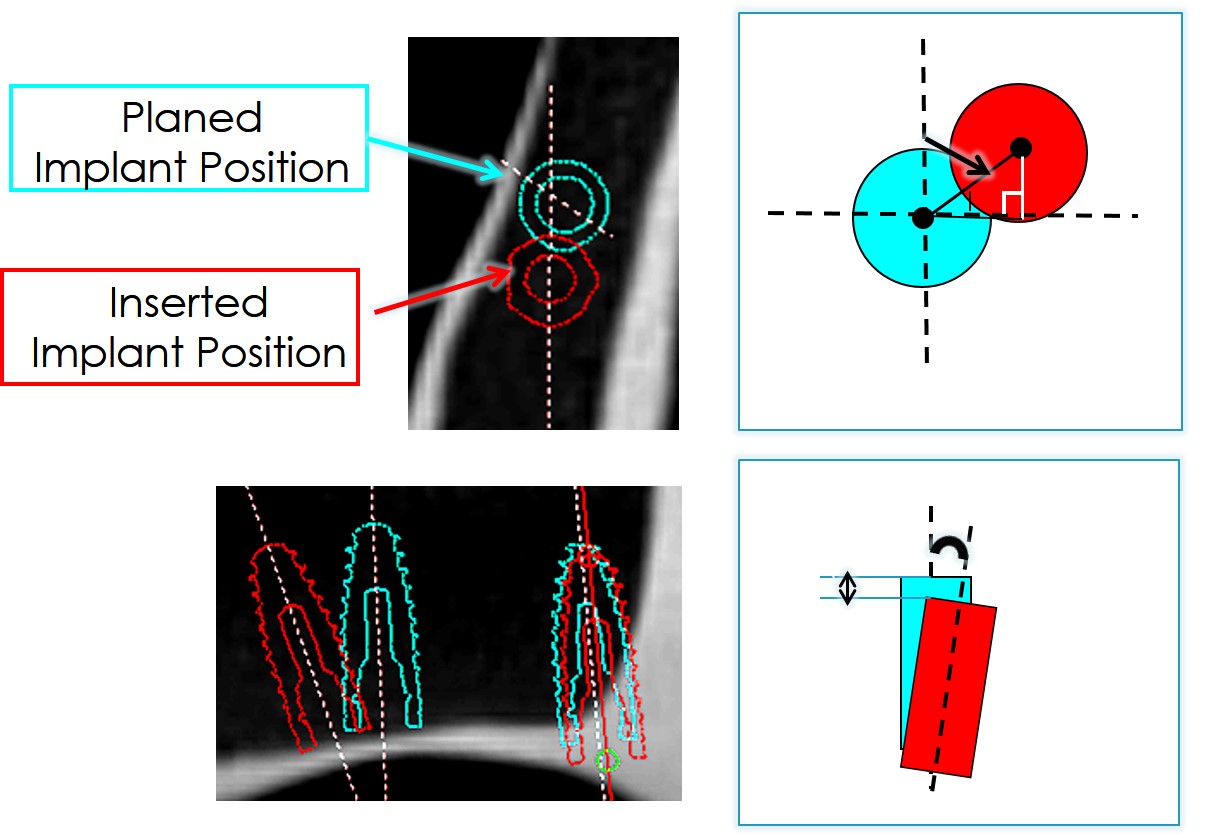
After the placements, we evaluated the position, depth and direction.
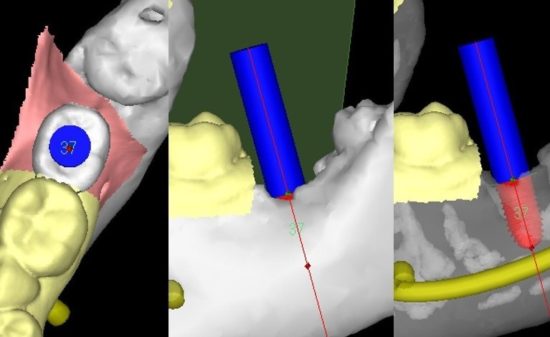
Blue shows planned implant position and red shows actual inserted implant position.
Accident Error of Implant Position, Depth, Angle with and without Guided Surgery (iCAT, FAINSIA 的心)
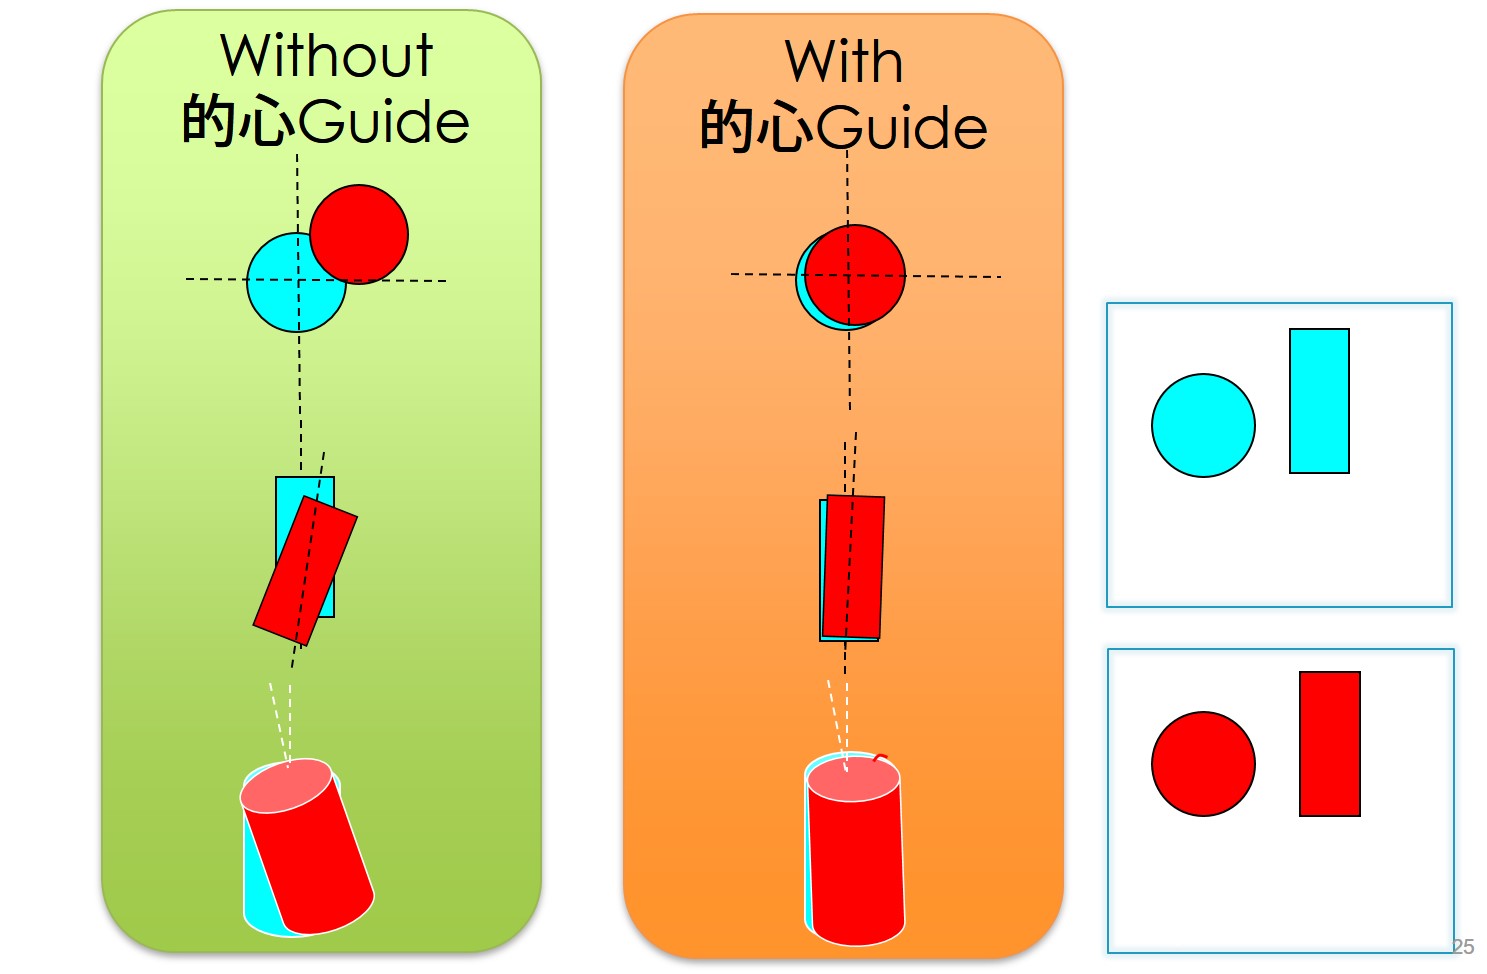
The result showed on slide, without Tekishin Guide, 20 implant is like this.
Some surgeons could place the implant as planned, however, others placed in terrible positions.
OK, I understand that Surgical Guide is useful.
However, I am a expert of implant Surgery, So, I do not need Surgical Guide.
My skill (Hands of God) guide implant properly.
OK!!
Do to your family
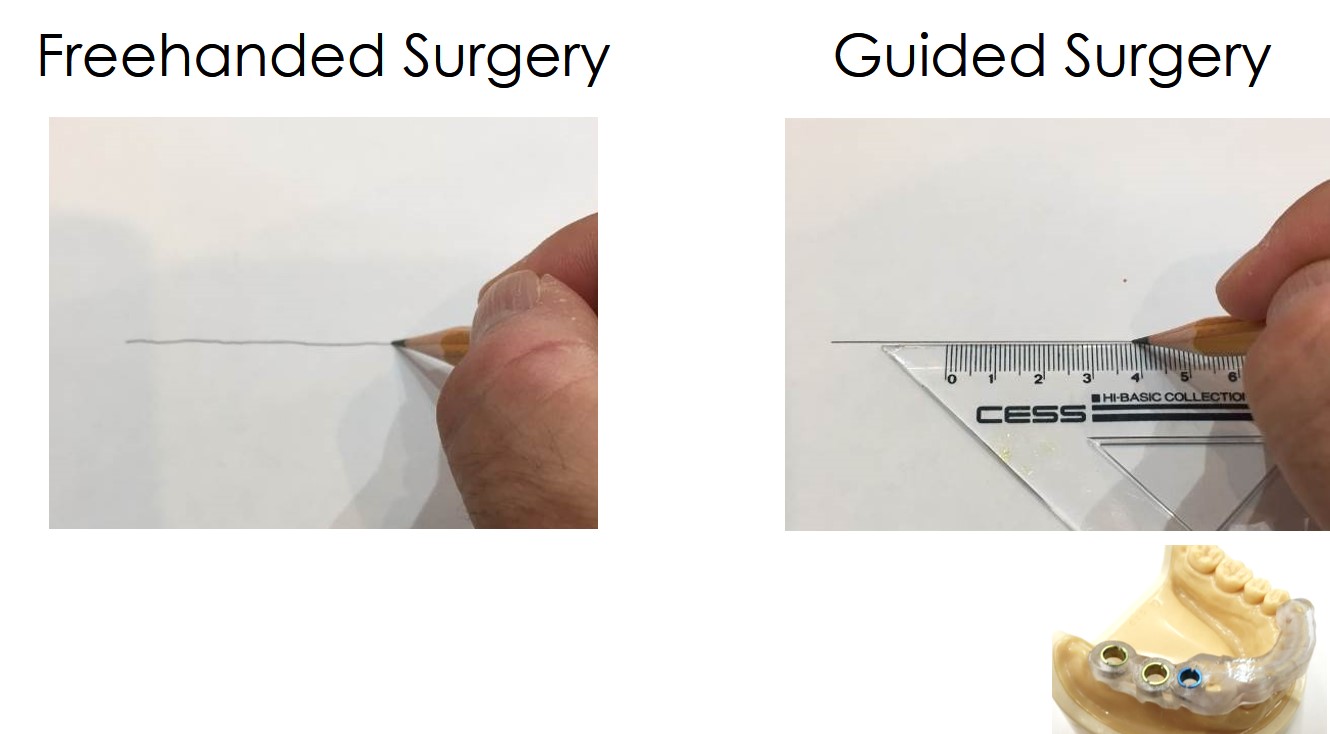
Which way can you draw a straight line precisely??
Surgical Guide is a useful tool like a scale. If you want to draw a straight line
You can draw the straight line better with a scale.
Precise Surgery done by Surgical Guide.
Then, how about PROSTHESIS??
“CAD/CAM Crown” have been established through longstanding clinical application
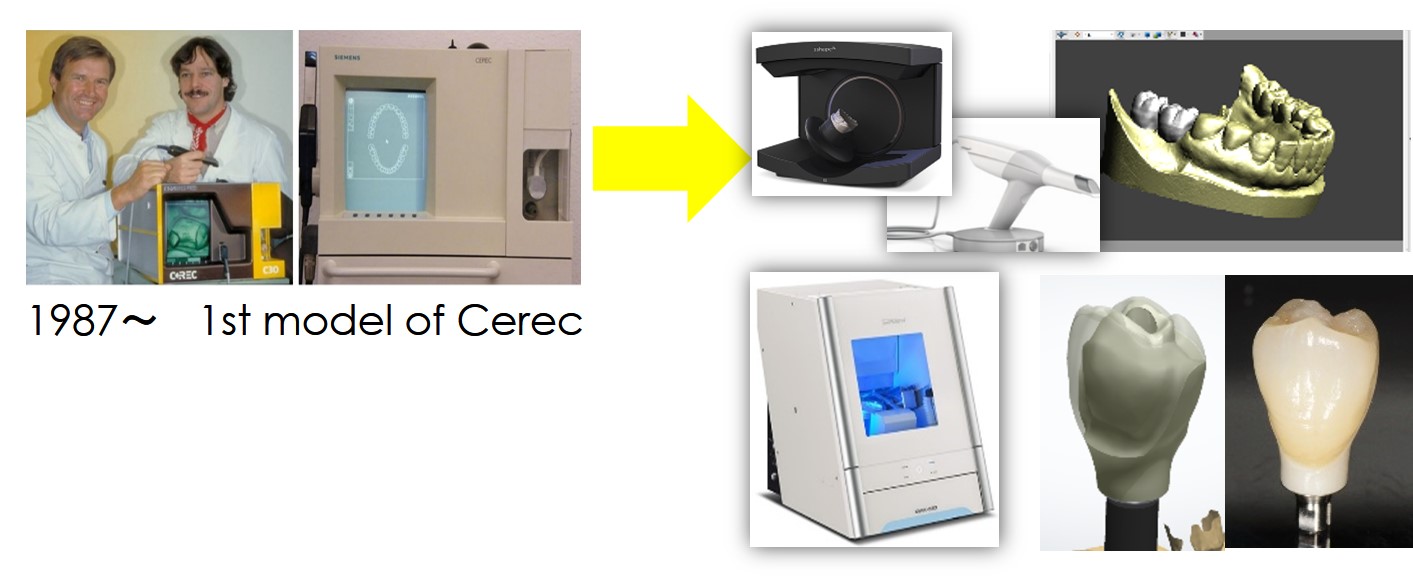
Well, Precise Surgery can be done by Surgical Guide. How about PROSTHESIS??
As you may already know, CAD/CAM technology started to be applied to dental treatments in 1980’s. Because of its growth, it has been actively used not only for standard crowns and bridges but also for implant prosthesis
The Advent of a New Generation
CAD/CAM Crown is now integrated with Implant Support System.
5th Generation is now coming
5th Generation: A New Implant Digital Solution
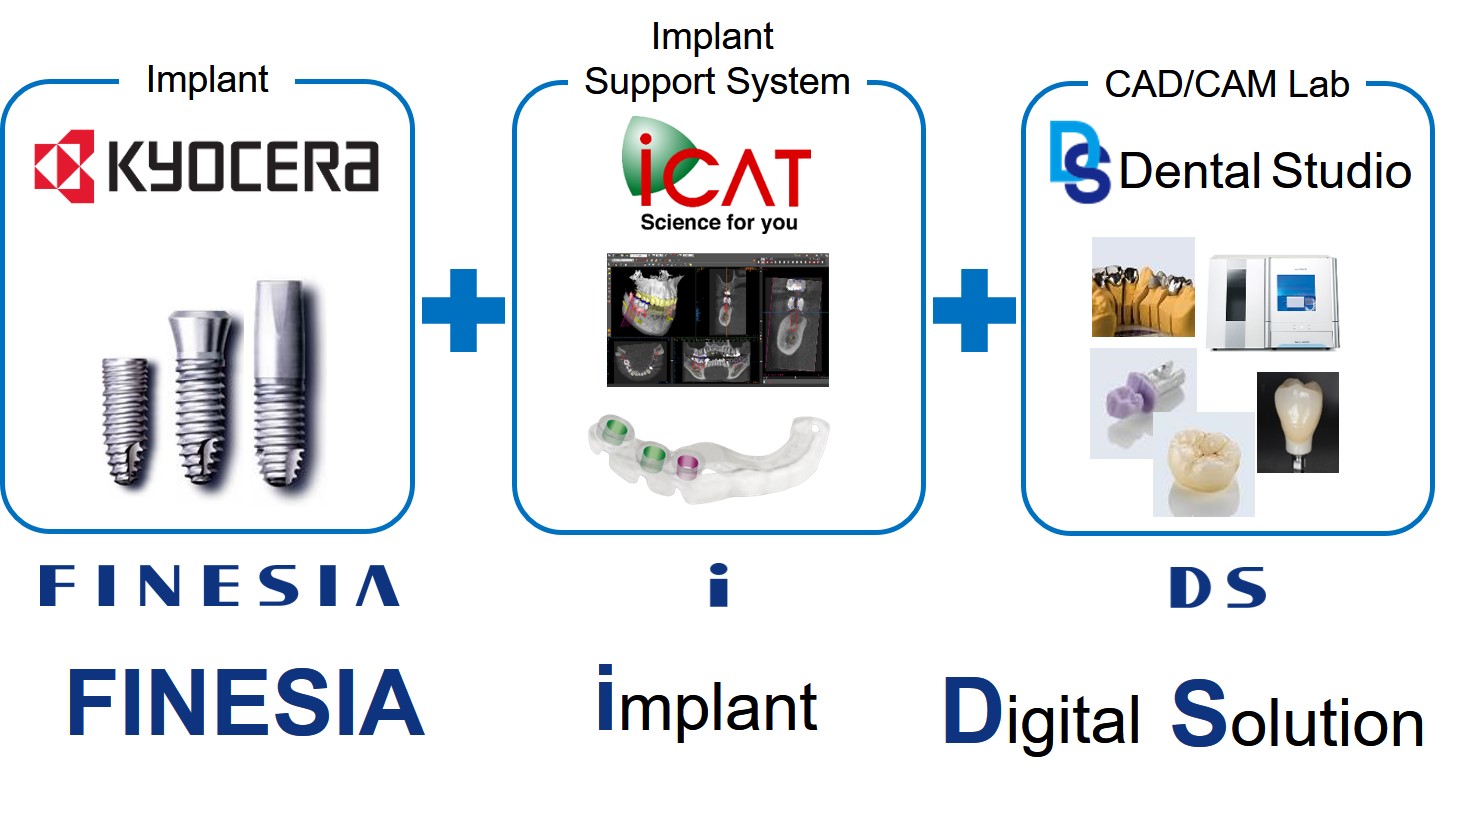
Let me introduce New Implant Digital Solution by 3 Japanese companies
3 Japanese companies, implant manufacturer, “Kyocera”, implant support system manufacturer, “iCAT”, and CAD/CAM-based dental laboratory, “DS Dental Studio”. They collaborated and realized “FINESIA iDS”, FINESIA Implant Digital Solution.
5th Generation: A New Implant Digital Solution
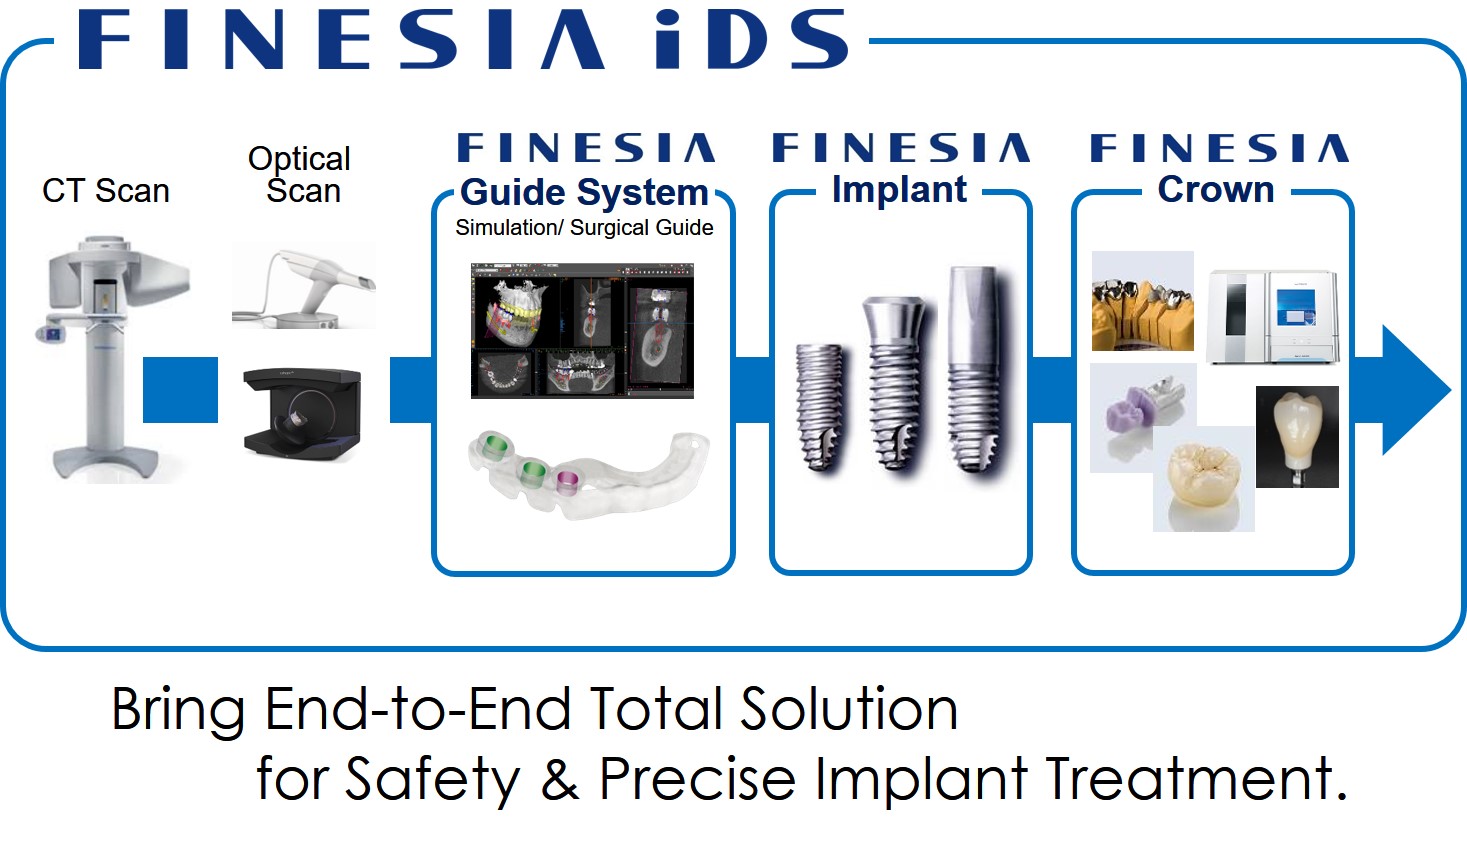
This is a concept of FINESIA iDS.
Based on Scan data, FINESIA Guide System, Implant, Crown, Bring end-to-end total solution for safety, precise implant treatment.
Workflow of FINESIA iDS
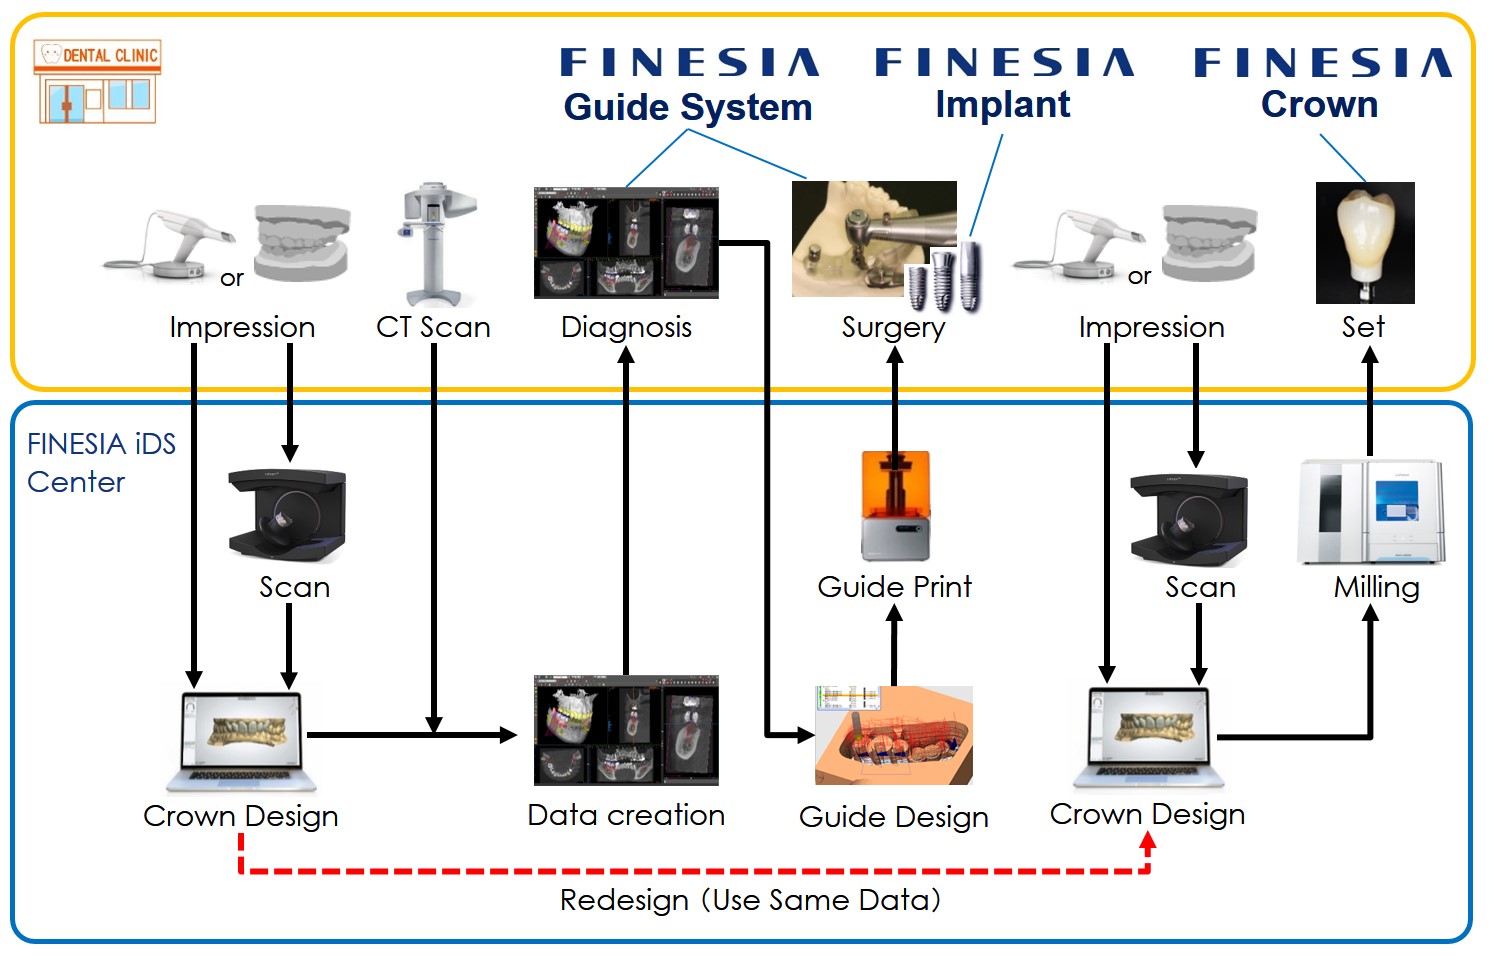
This is FINESIA iDS workflow
Once you take digital or analog impression, send it to FINESIA iDS Center, then Preoperative CAD Wax-up are made by Dental Technician.
This is combined with CT data and simulation data is created.
Make diagnosis based on this data and send it to FINESIA iDS Center. FINESIA iDS Center then design and print the guide.
Deliver the surgery guide to you for precise guided surgery.
When it come to final prosthesis, take impression again and design the crowns.
For this step, Preoperative CAD Wax-up data is re-used. Once the design of final prosthesis is decided, make the crown and set it to the patient.
In this workflow, Diagnosis and Surgery part is FINESIA Guide System, Implant is FINESIA Implant, Restoration Work is FINESIA Crown
All 3 together makes FINESIA iDS
Features of FINESIA iDS
-
Diagnosis:

Crown Shape is essential for Top-Down Implant Simulation !
From this slide, I am going to introduce FINESIA iDS.
Firstly, Diagnosis.
In the past, implant position was decided based on the jaw bone situation.
This is called “Surgery-driven” Implant or “Bottom-Up” Treatment.
However, recently, implant placement position is decided based on Crown shape of final prosthesis.
This is called “Prostho-Driven” Implant or “Top-Down” Treatment.
So, Crown Shape is essential for preoperative Top-Down Implant Simulation.
Features of FINESIA iDS
-
Diagnosis:
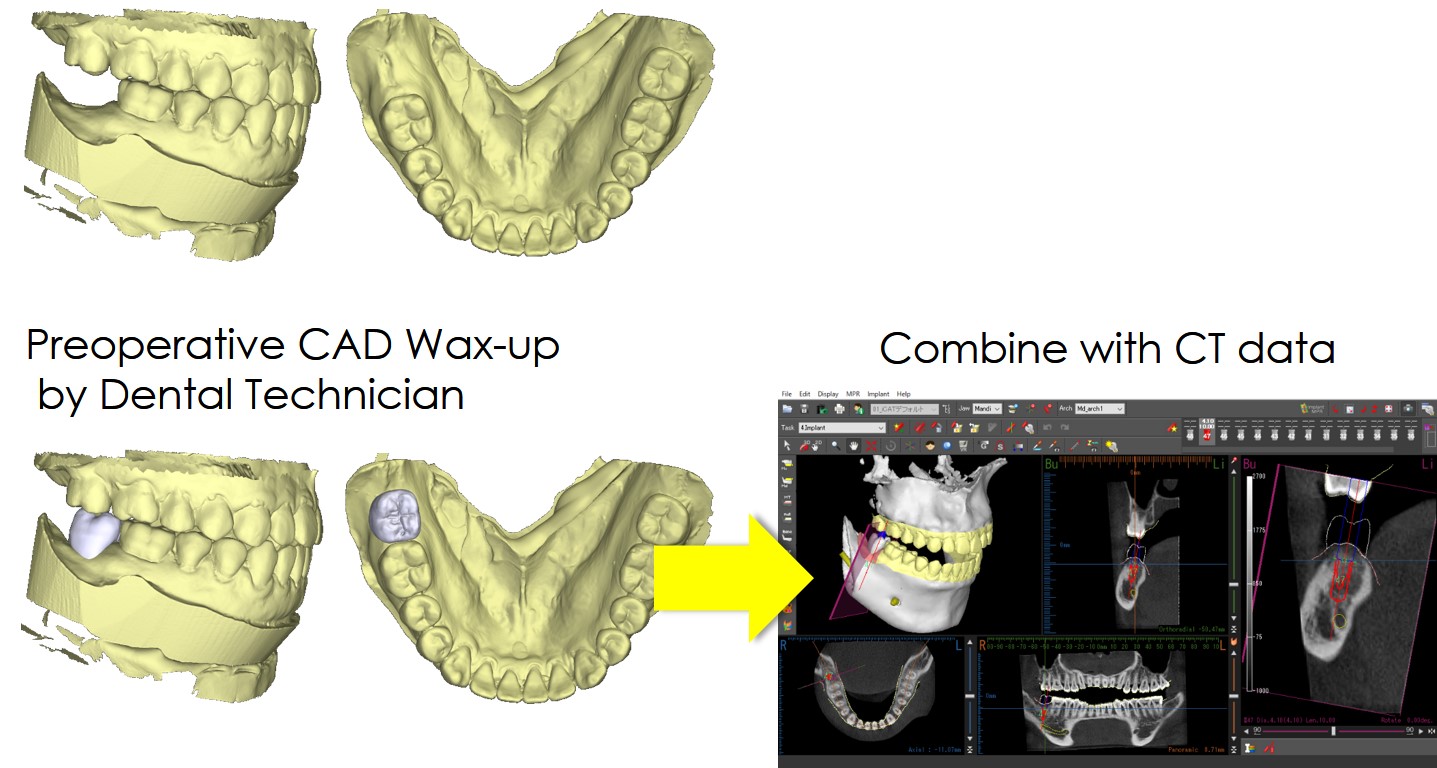
To reflect Crown Shape to the diagnosis, Japanese excellent dental technicians make preoperative CAD Wax-up and combine it with the CT data
Features of FINESIA iDS
-
Diagnosis : Top-Down Simulation with precise Crown Shape
And we plan simulate the implant position, considering with thw final Crown Shape
Features of FINESIA iDS
-
Diagnosis : High-end Implant Simulation Software made in Japan
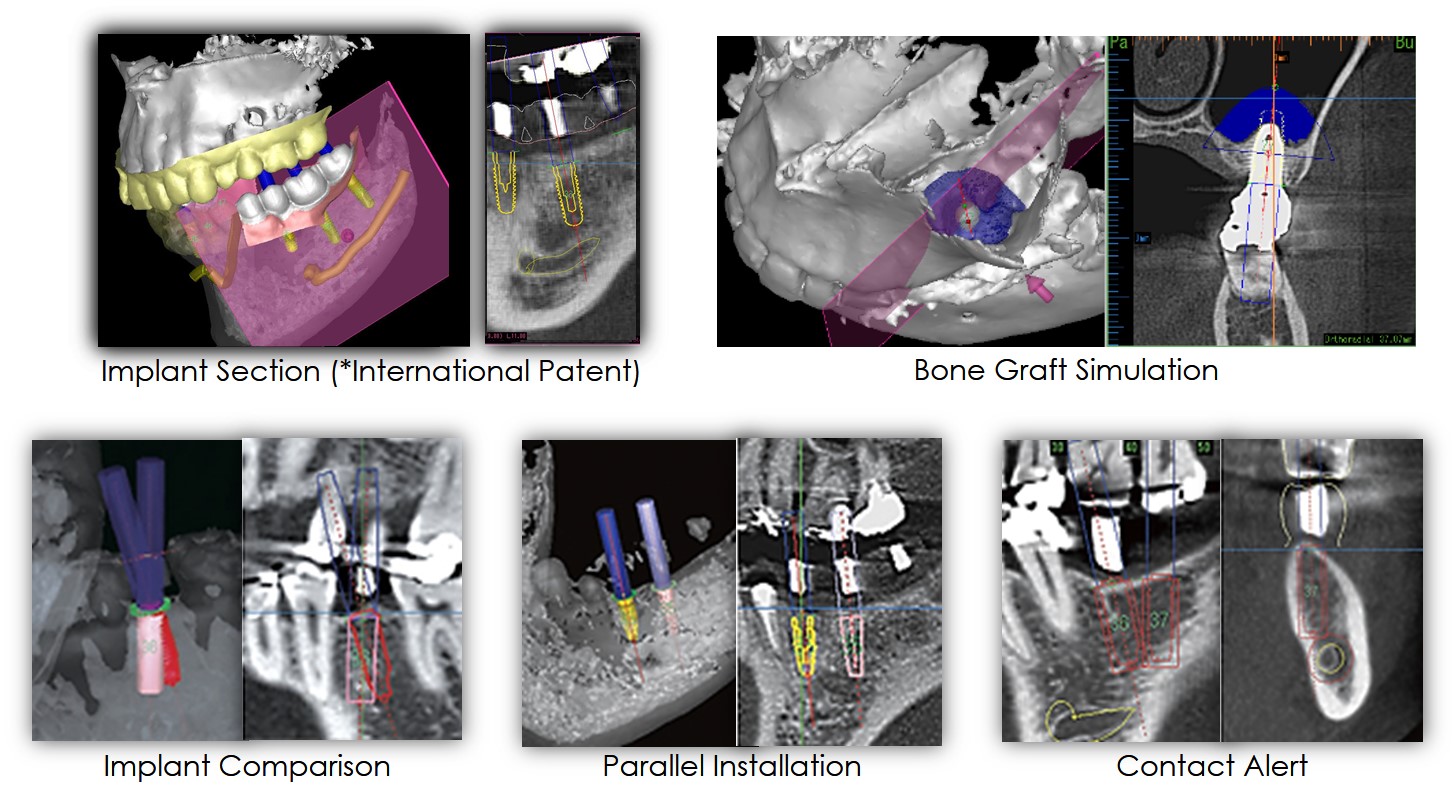
Additionally, iCAT’s High-end Implant Simulation Software, a leading share in Japan, has various features like Implant Section, Bone Graft Simulation, Implant Comparison, Parallel Installation, Contact Alert and many more useful features for you to make more precise simulation.
Features of FINESIA iDS
-
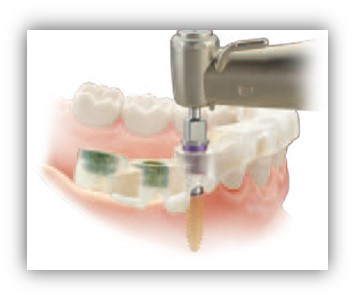
Surgery : Guided Surgery with “FINESIA GUIDE”
⇒ Support from drilling to Implant placement
* For 1P and TL, implant placements without Surgical Guide
⇒ Simple drill procedure (with minimum 2 drills, without Drill-Key)
* 3rd Drill: Tap Former for hard bone
⇒ Compatible with 3 different implant lineups
Next, Iwouldlike toexplain Guided Surgery with FINESIA GUIDE
FINESIA GUIDE supports from drilling to Implant placement
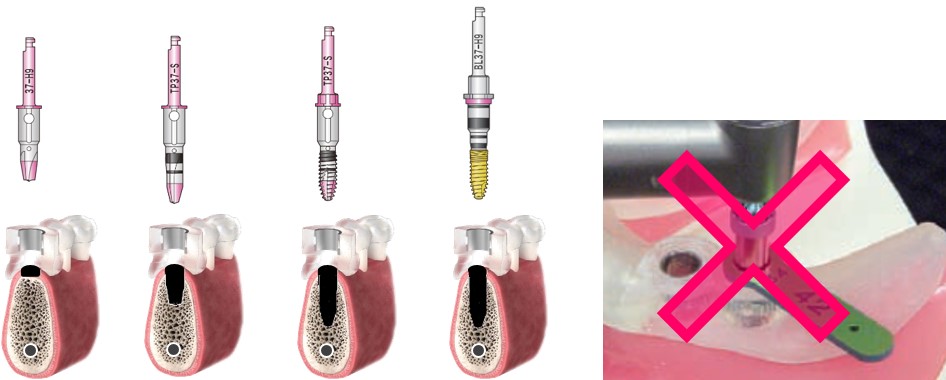
Drill procedure is very simple using minimum 2 drills, Starting Drill and Final Drill.
For hard bone, we use Tap Former.
Compare toanother company,No Drill-Key is required.
This drill system is compatible with all 3 kinds of FINESIA implants
Features of FINESIA iDS
-
Surgery : Guided Surgery with “FINESIA GUIDE”
⇒ Can choose any support type up to your surgery methods
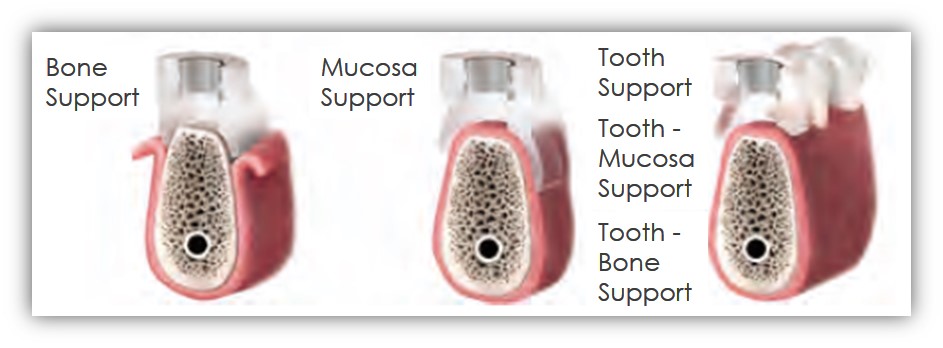
⇒ 3 heights of Surgical Guide for broad indications

Also, up to your surgery methods, it is possible to choose support type, not only bone support, mucosa support, tooth support but also
tooth-mucosa support and tooth-bone support.
FINESIA GUIDE has 3 different heights so can be used for broad indications like steep bone crest, extraction cavity and thick gingiva.
Features of FINESIA iDS
-
Surgery : Guided Surgery with “FINESIA GUIDE”
⇒ ”Tailor-made Guide” designed by Japanese Dental Technician
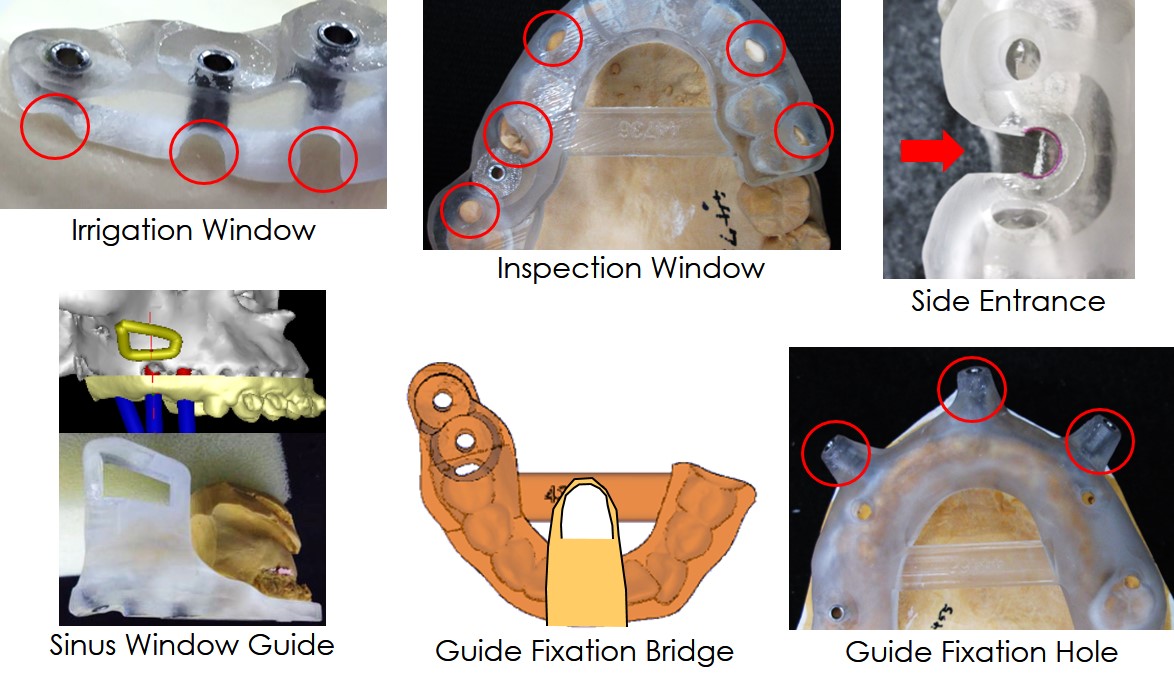
Different from “DIY Guide” & “Automate Guide”
Above all, the biggest feature is “Tailor-made Guide” designed by Japanese Dental Technician.
To support precise guided surgery, various customization like Irrigation Window, Inspection Window, Side Entrance, Sinus Window, Fixation Bridge, Fixation Hole etc are possible. It is totally different from “DIY Guide“, the one doctors and labs design the guides by themselves using software with Do it yourself style or “Automate Guide”, the one just automatically output the surgical guide shape corresponding to the placement positions.
Features of FINESIA iDS
-
Surgery : Surgical Procedure of FINESIA GUIDE
Let me share you the video of Guided Surgery by FINESIA GUIDE
I drill while the engine head is pressed weakly.
Features of FINESIA iDS
-
Prosthesis : Re-use Preoperative CAD Wax-up data for Final Prosthesis.
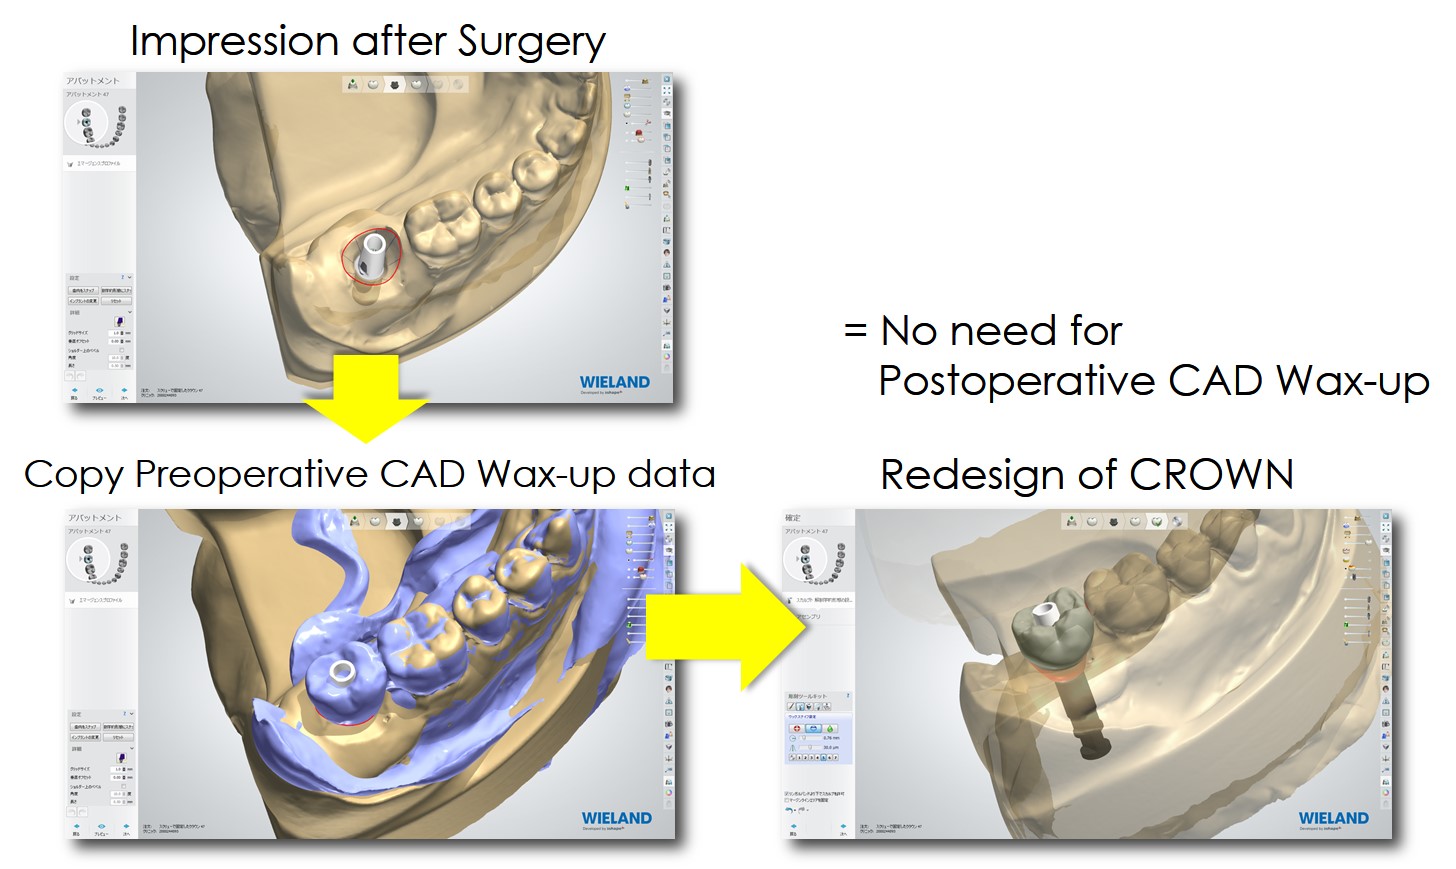
The final feature of FINESIA iDS is Prosthesis
The greatest feature here is re-using Preoperative CAD Wax-up data for final prosthesis design.
This makes No need for Postoperative CAD Wax-up.
Features of FINESIA iDS
-
Prosthesis : Digital end-to-end process from Postoperative CAD Wax-up to Final Prosthesis.
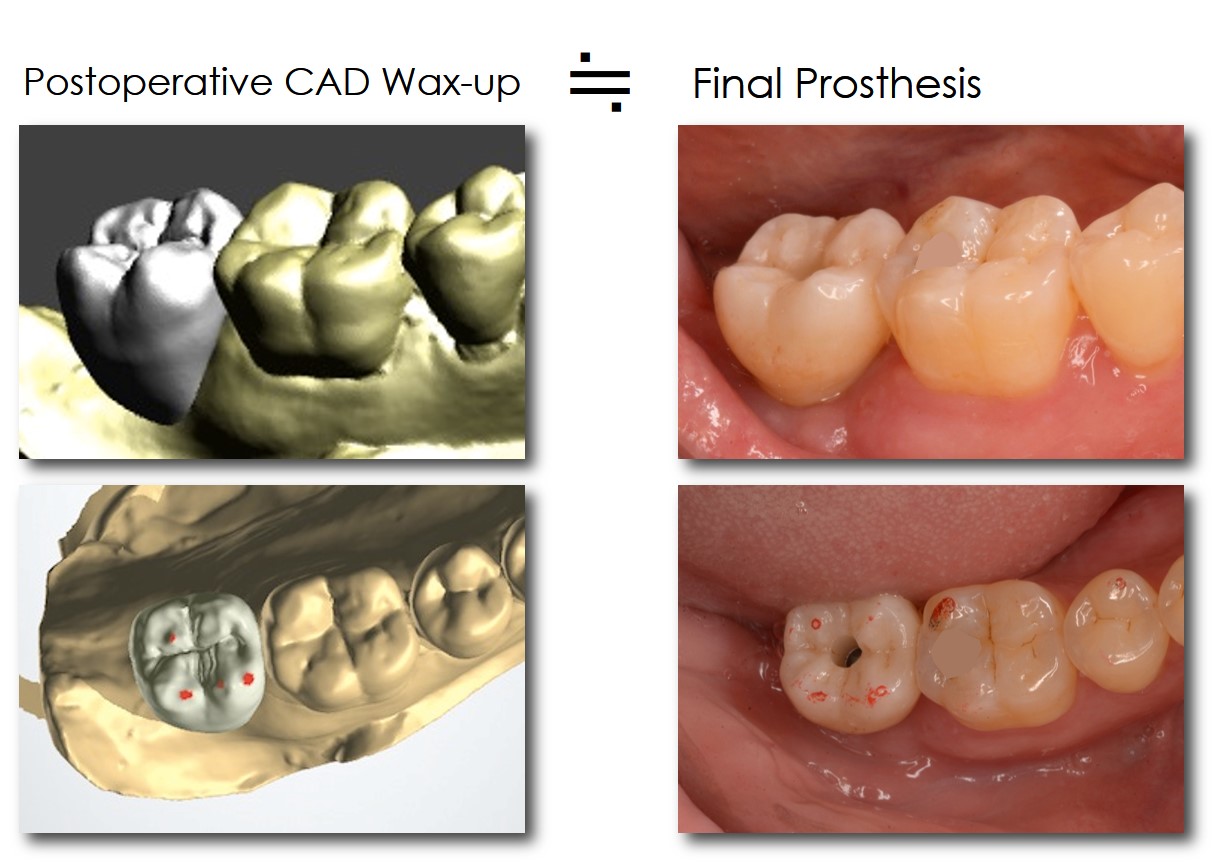
In addition, of course, the shape of final prosthesis will be similar to the postoperative CAD Wax-up so, for example the access hole, you can get the result according to your pre-op top-down simulation. Digital end-to-end process make highly predictable implant treatments possible, which never before
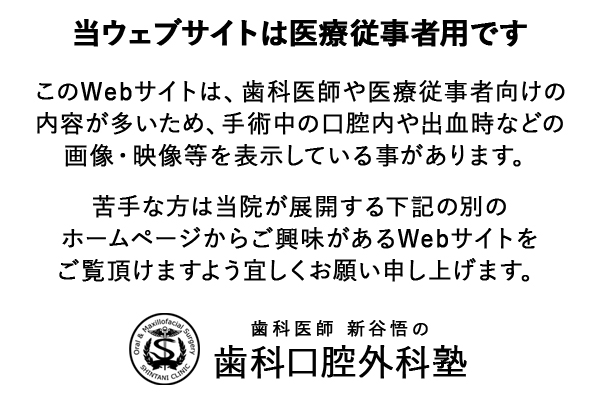
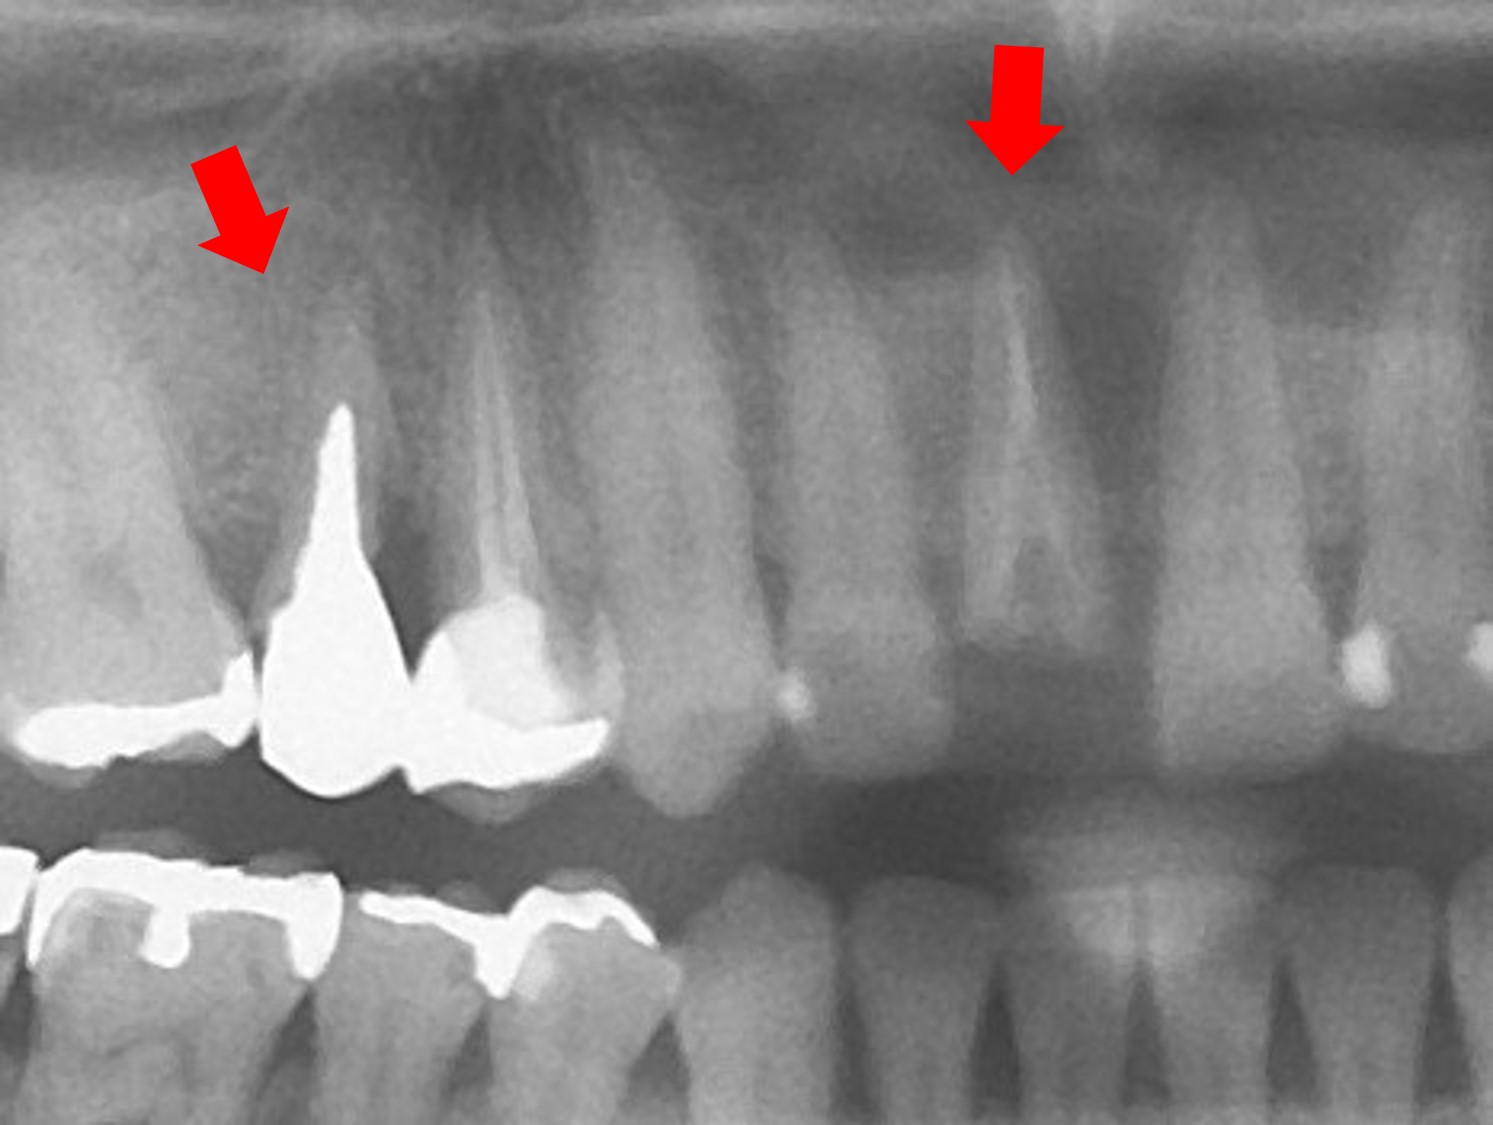
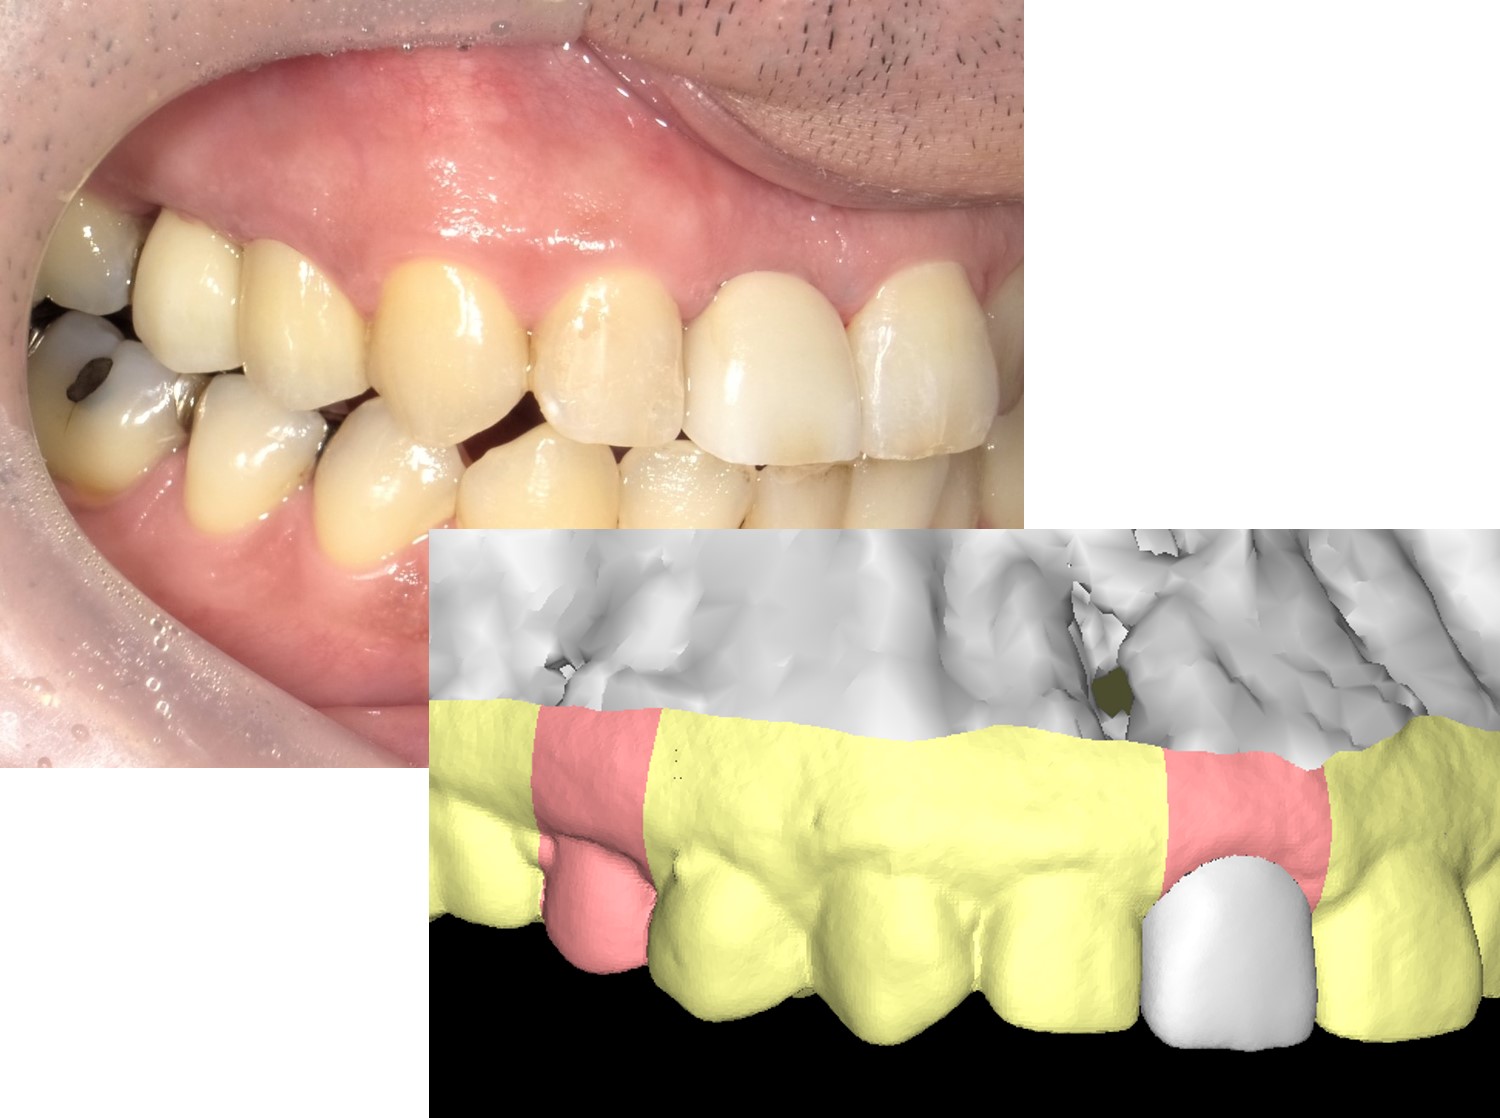
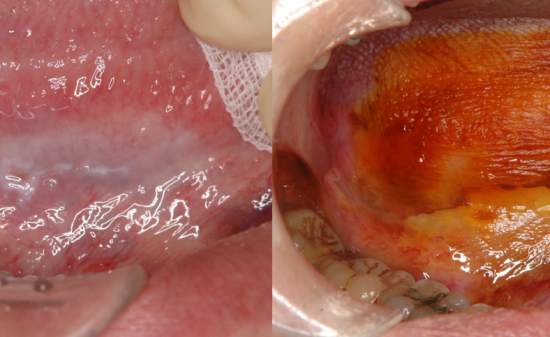
Case 1
Preoperative intraoral findings and X-ray findings
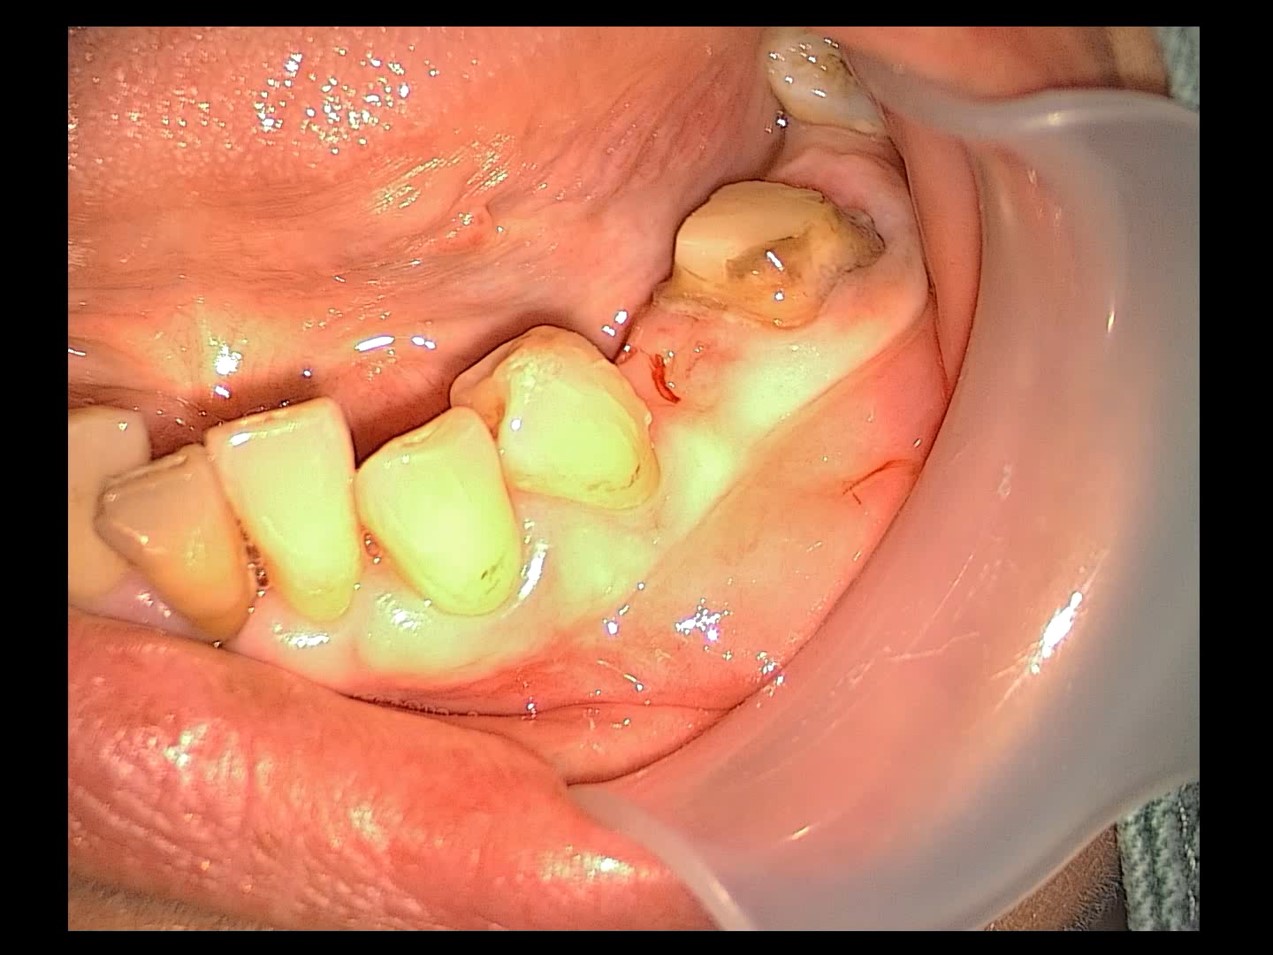
CASE1 is an immediate placement case on upper left remaining mobile deciduous canine tooth and premolar.
The patient is female in 20s. When her deciduous canine tooth and premolar became mobile,
she decided to come to my clinic for a consultation on possible treatment plans including implant treatment.
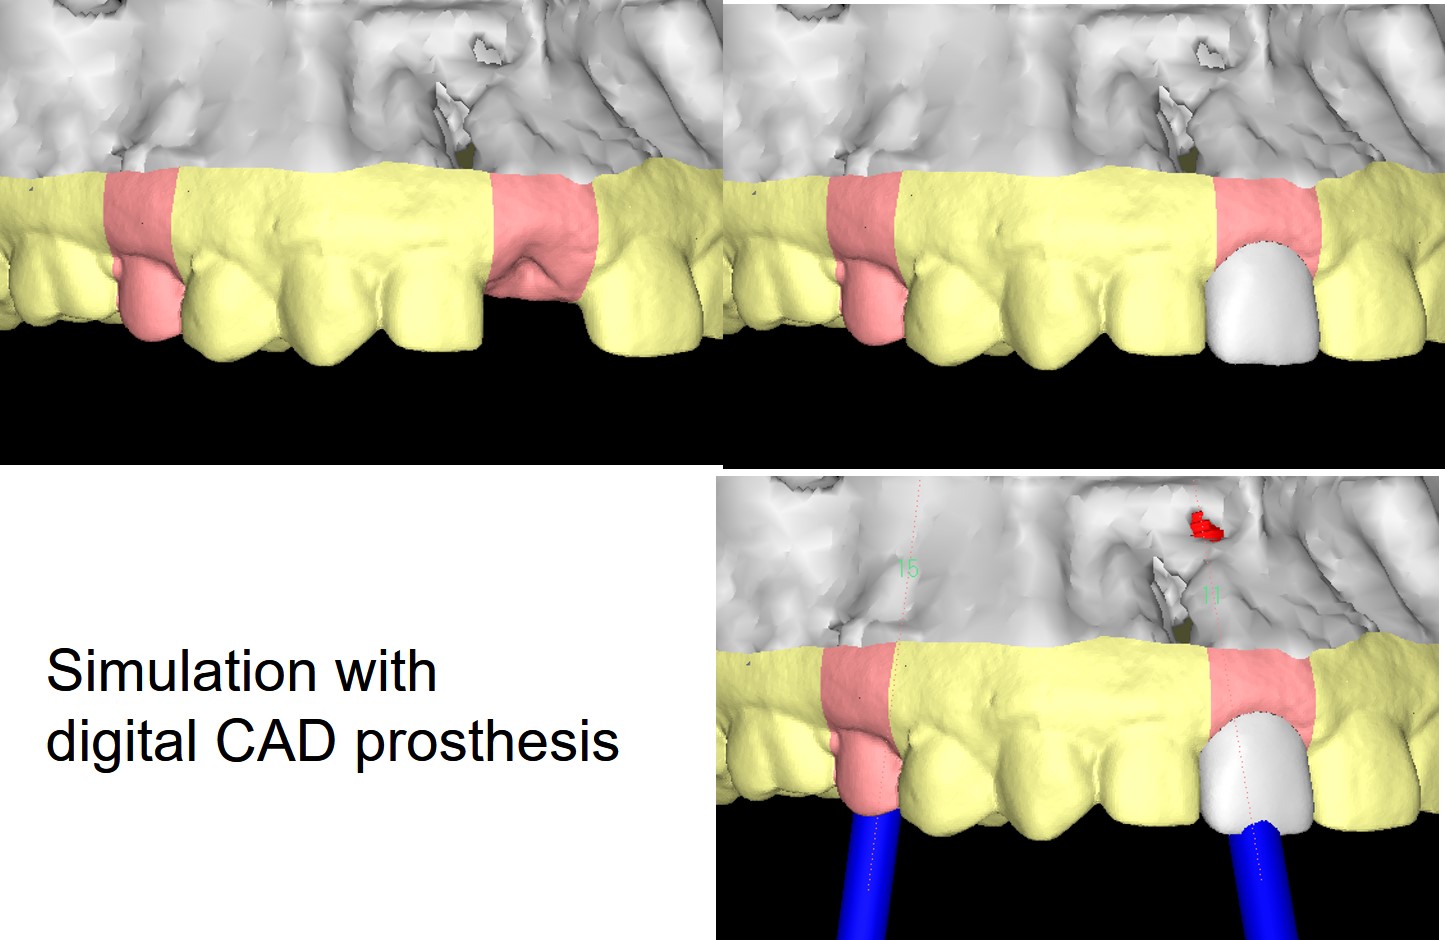
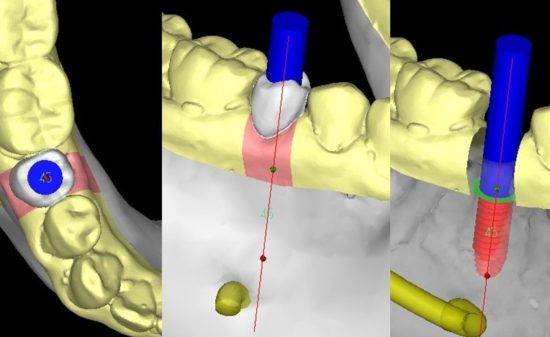
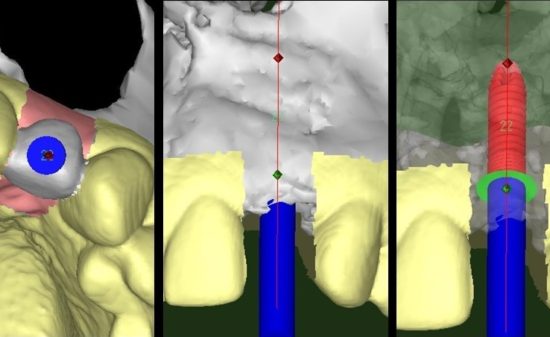
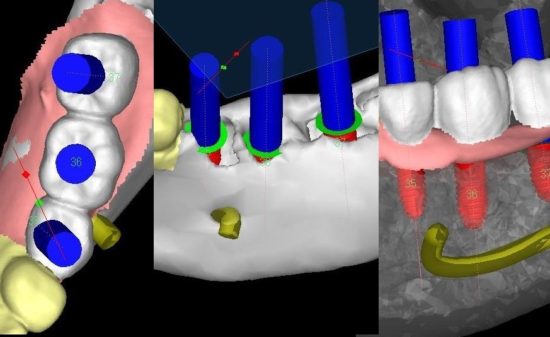
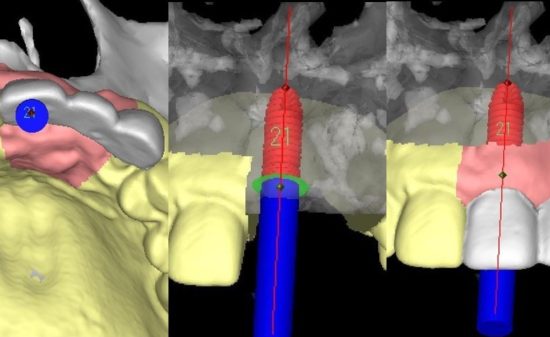
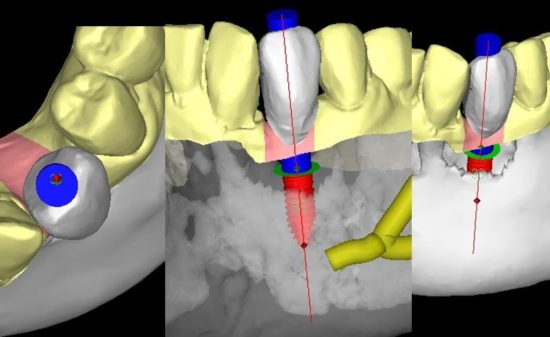
Simulation with digital CAD prosthesis
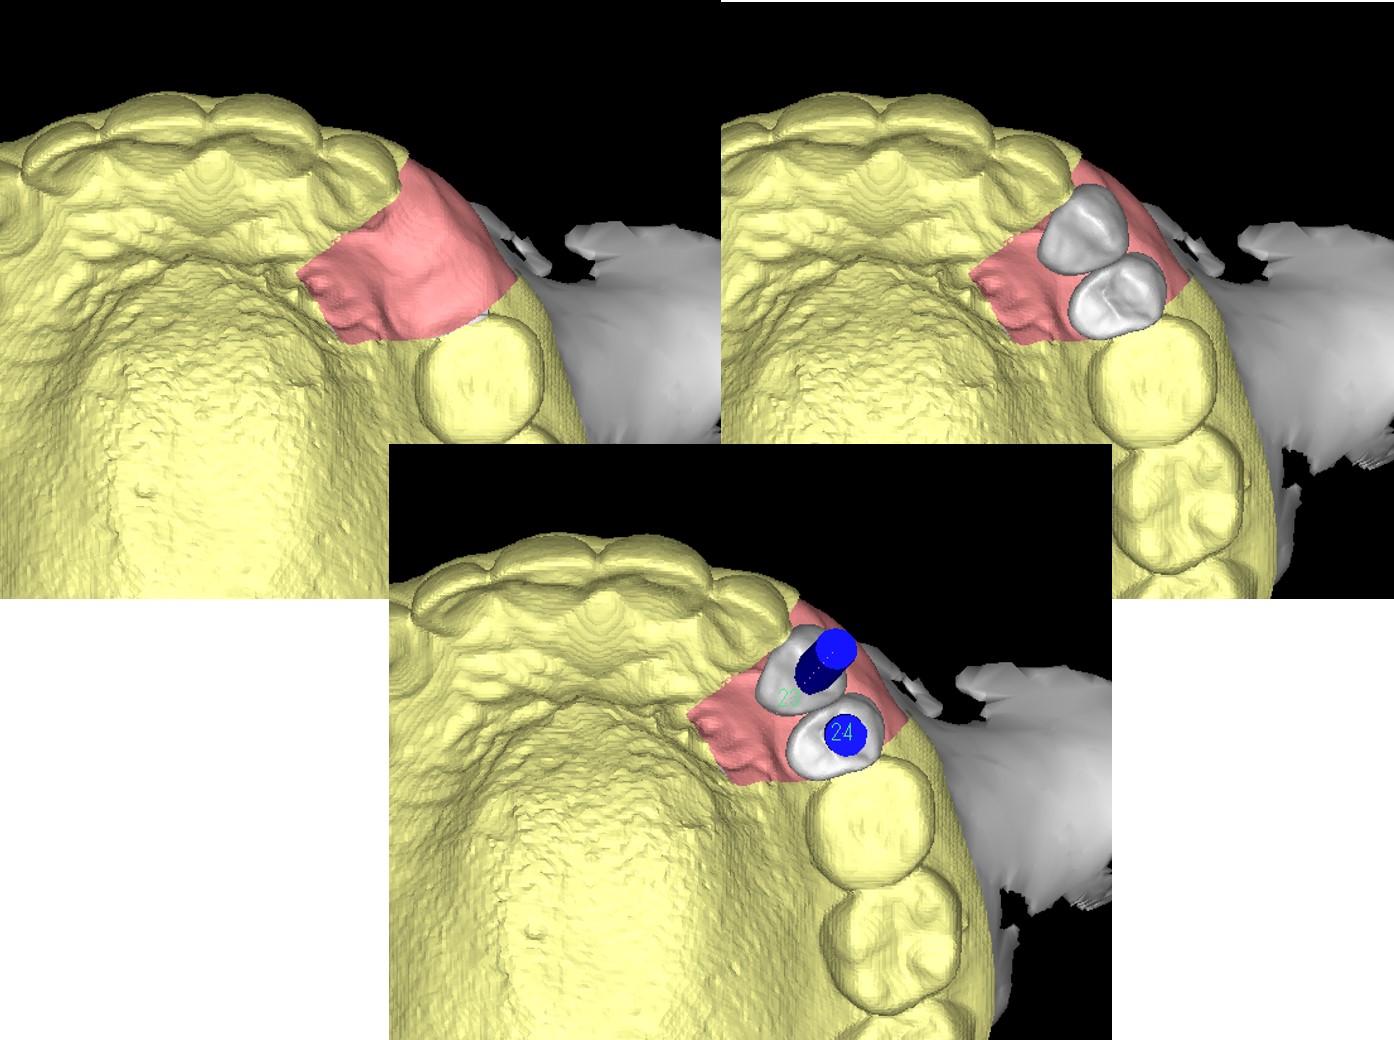
They are the images of iCAT’s LANDmarker. Prostho-driven placement positions were simulated.
Simulation for operation
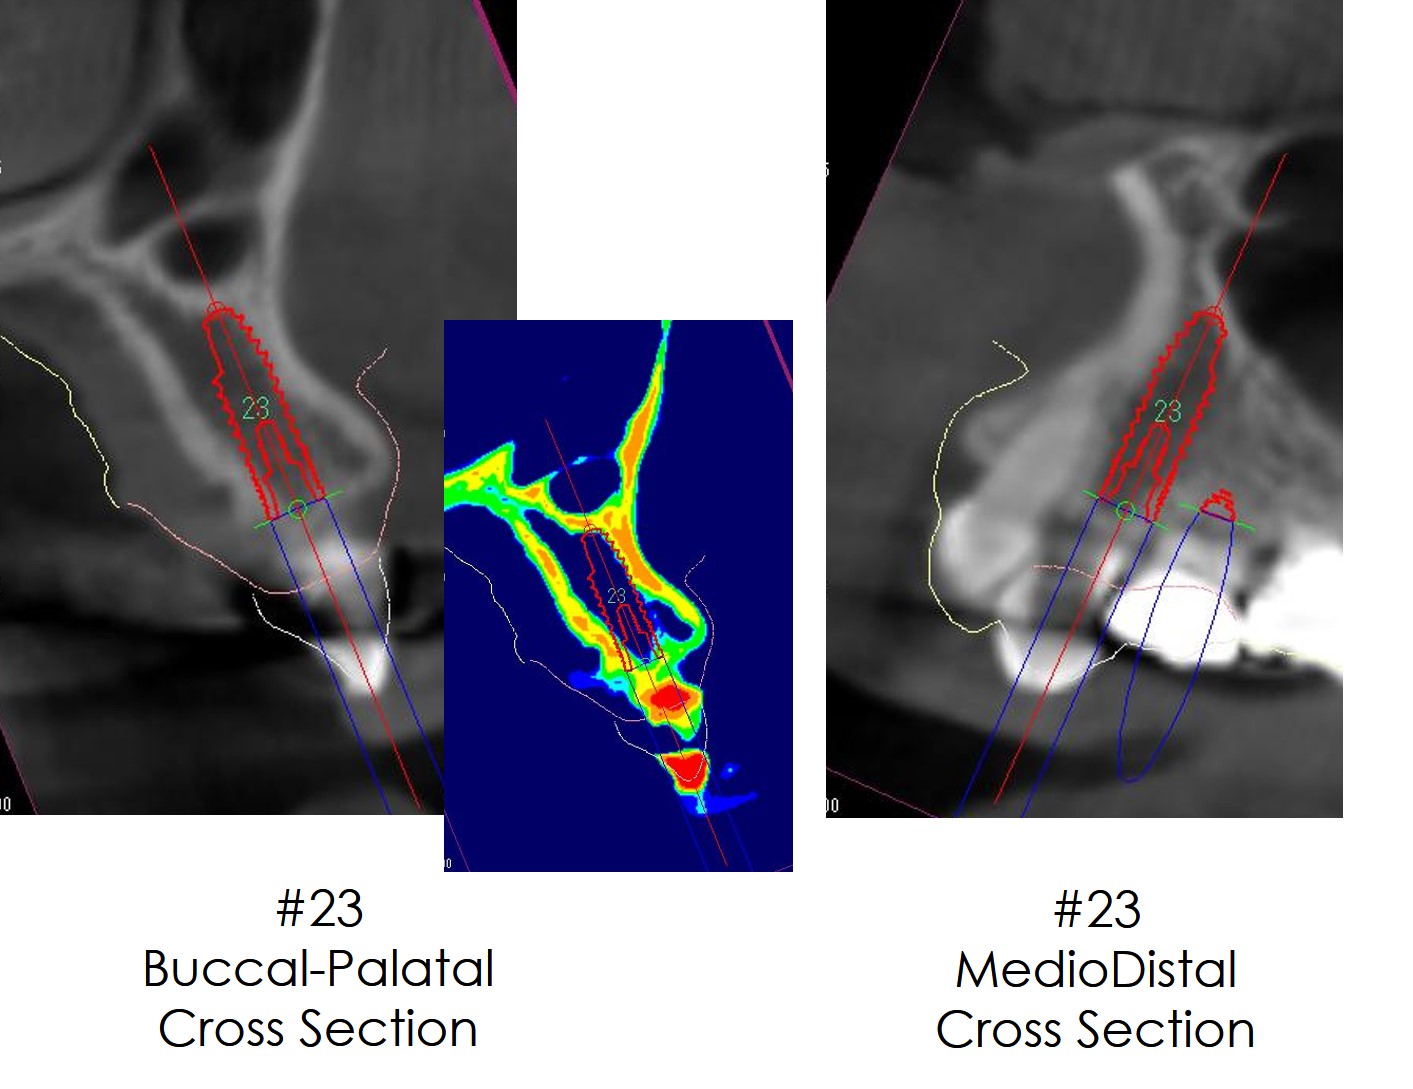
I could imagine the bone might be very soft so I chose implant length that I could get bi-cortical support.
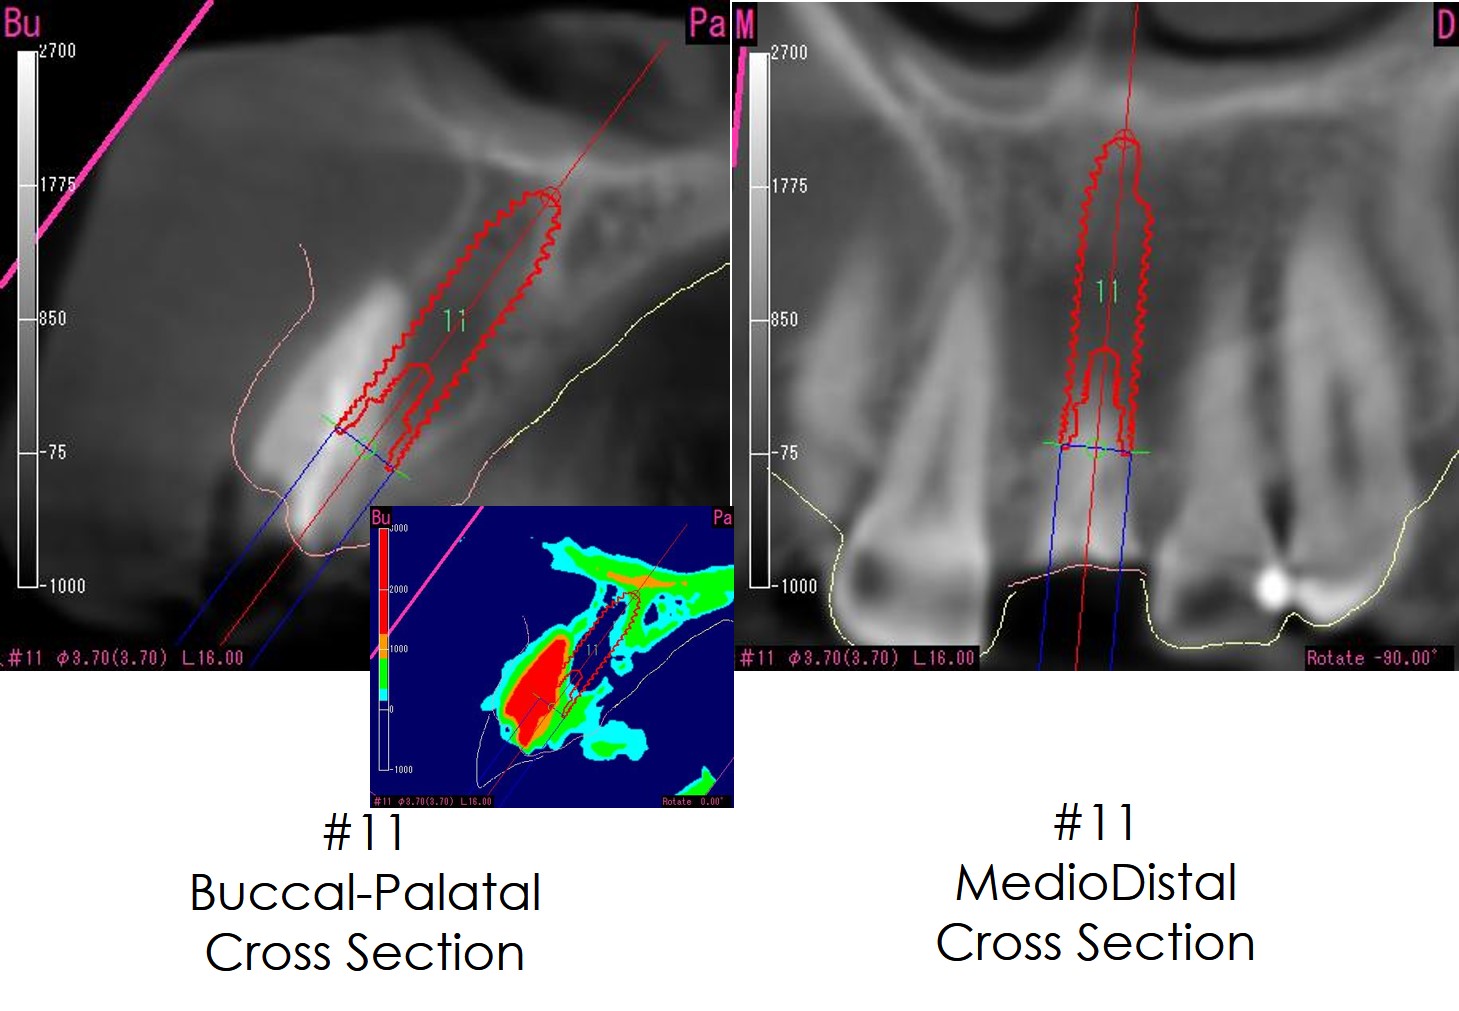
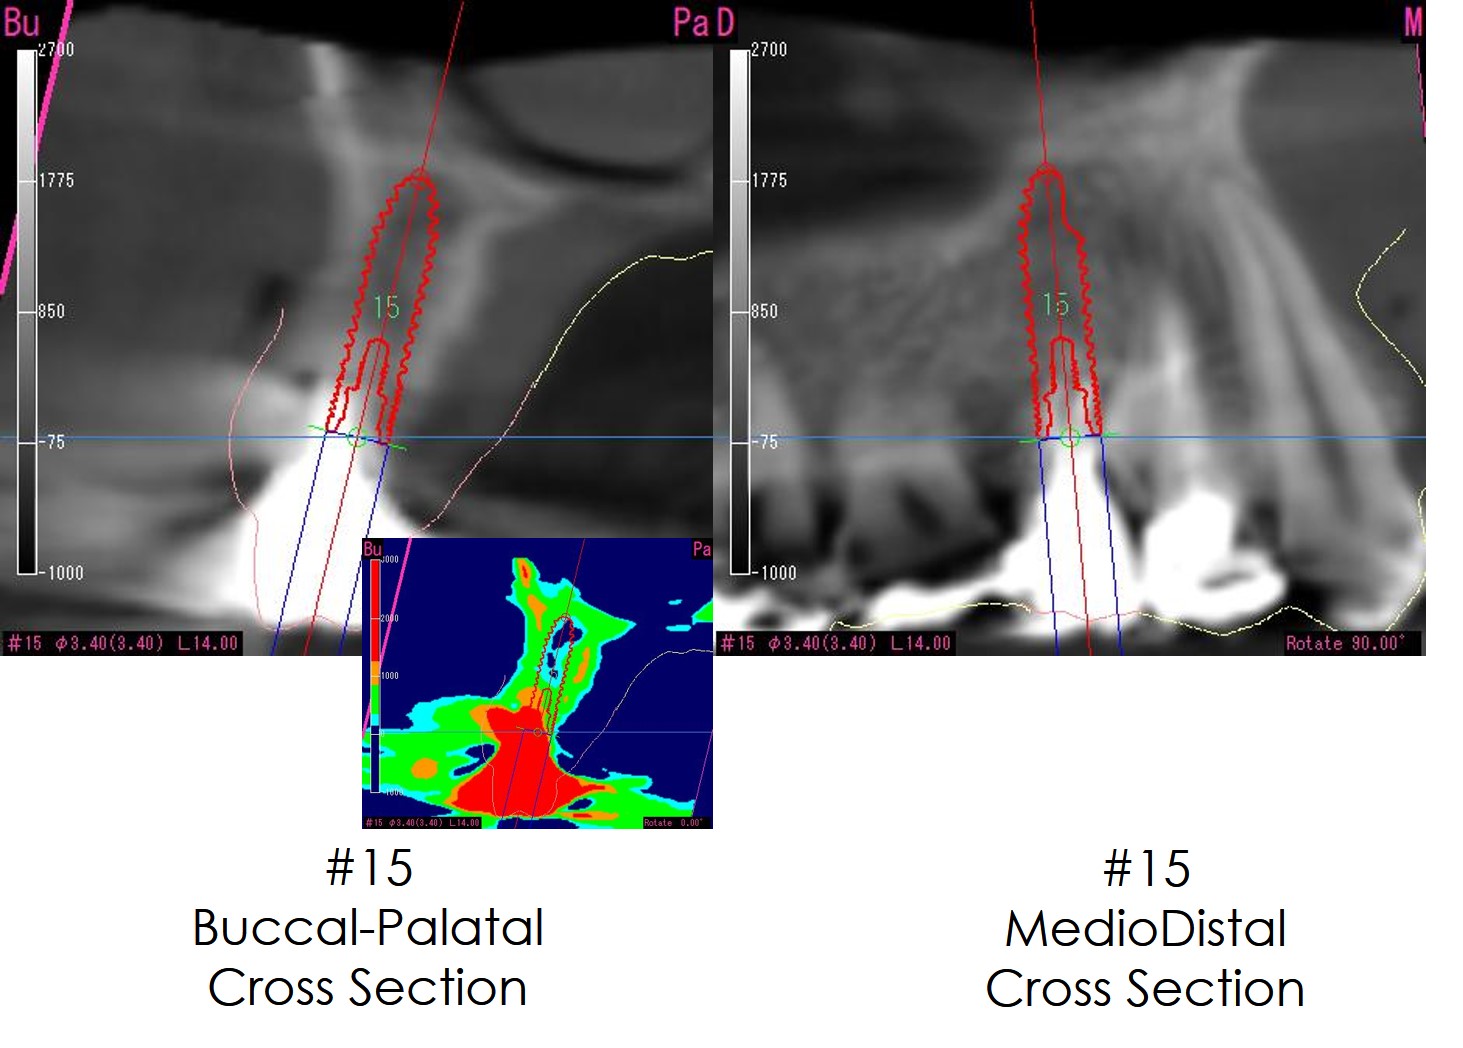
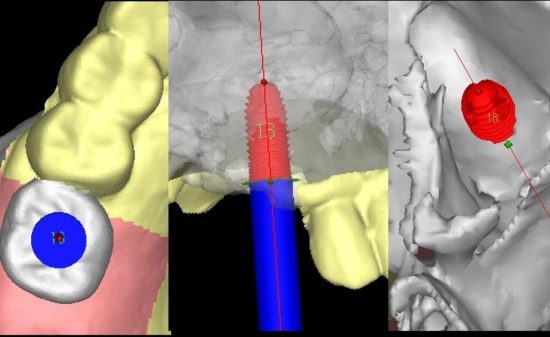
Simulation for operation
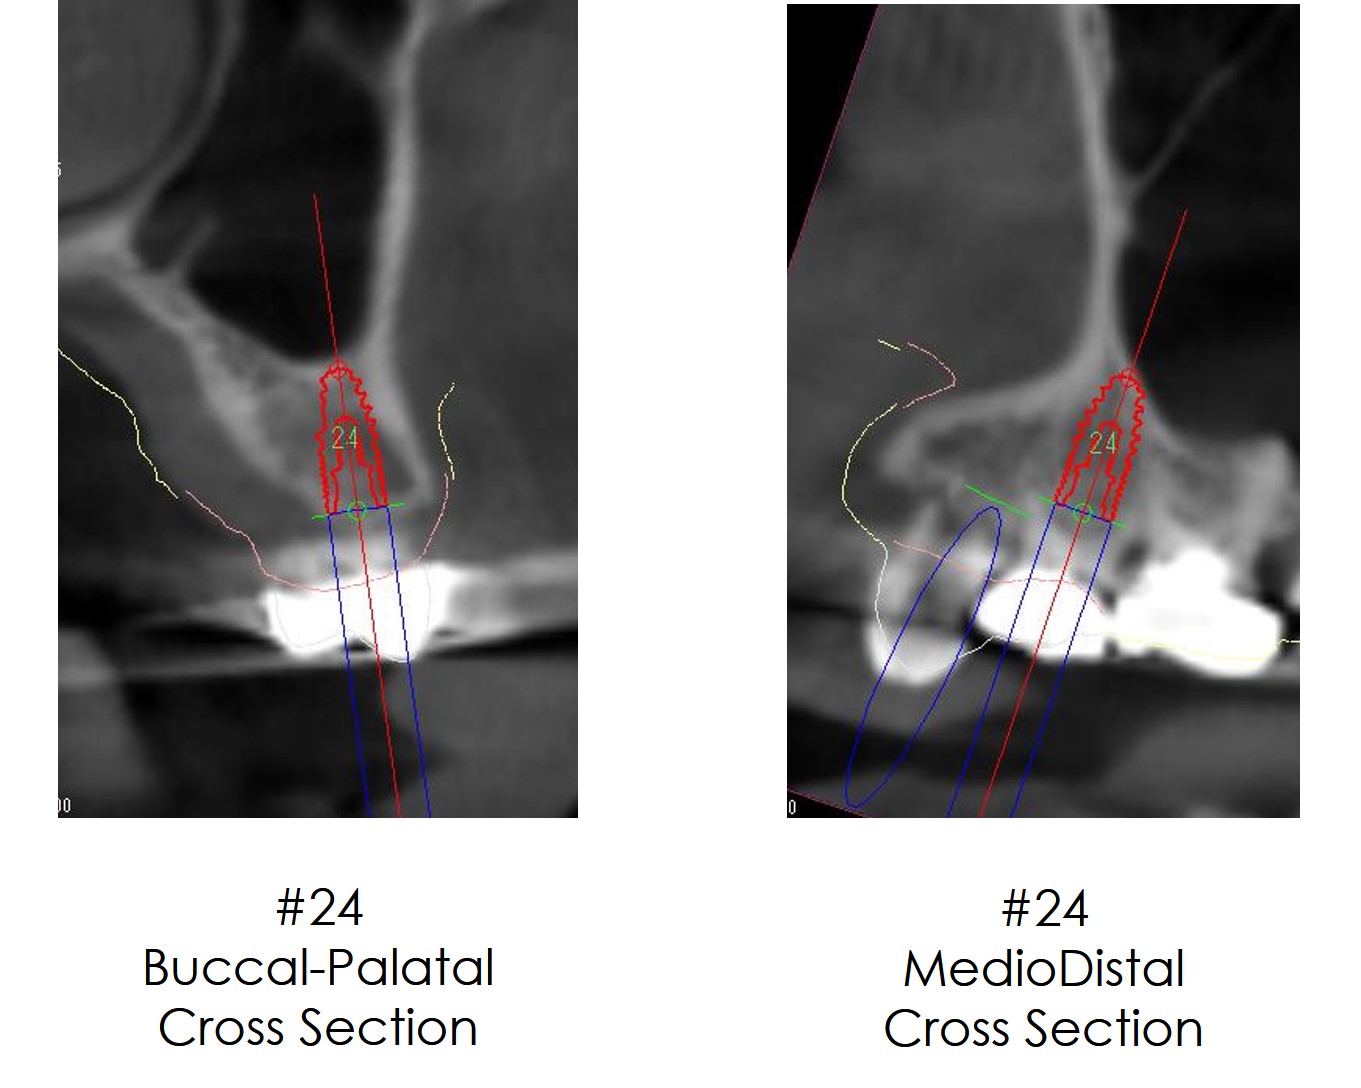
CT images of another placement site
Placement position was decided based on the bone shape and the prosthesis position.
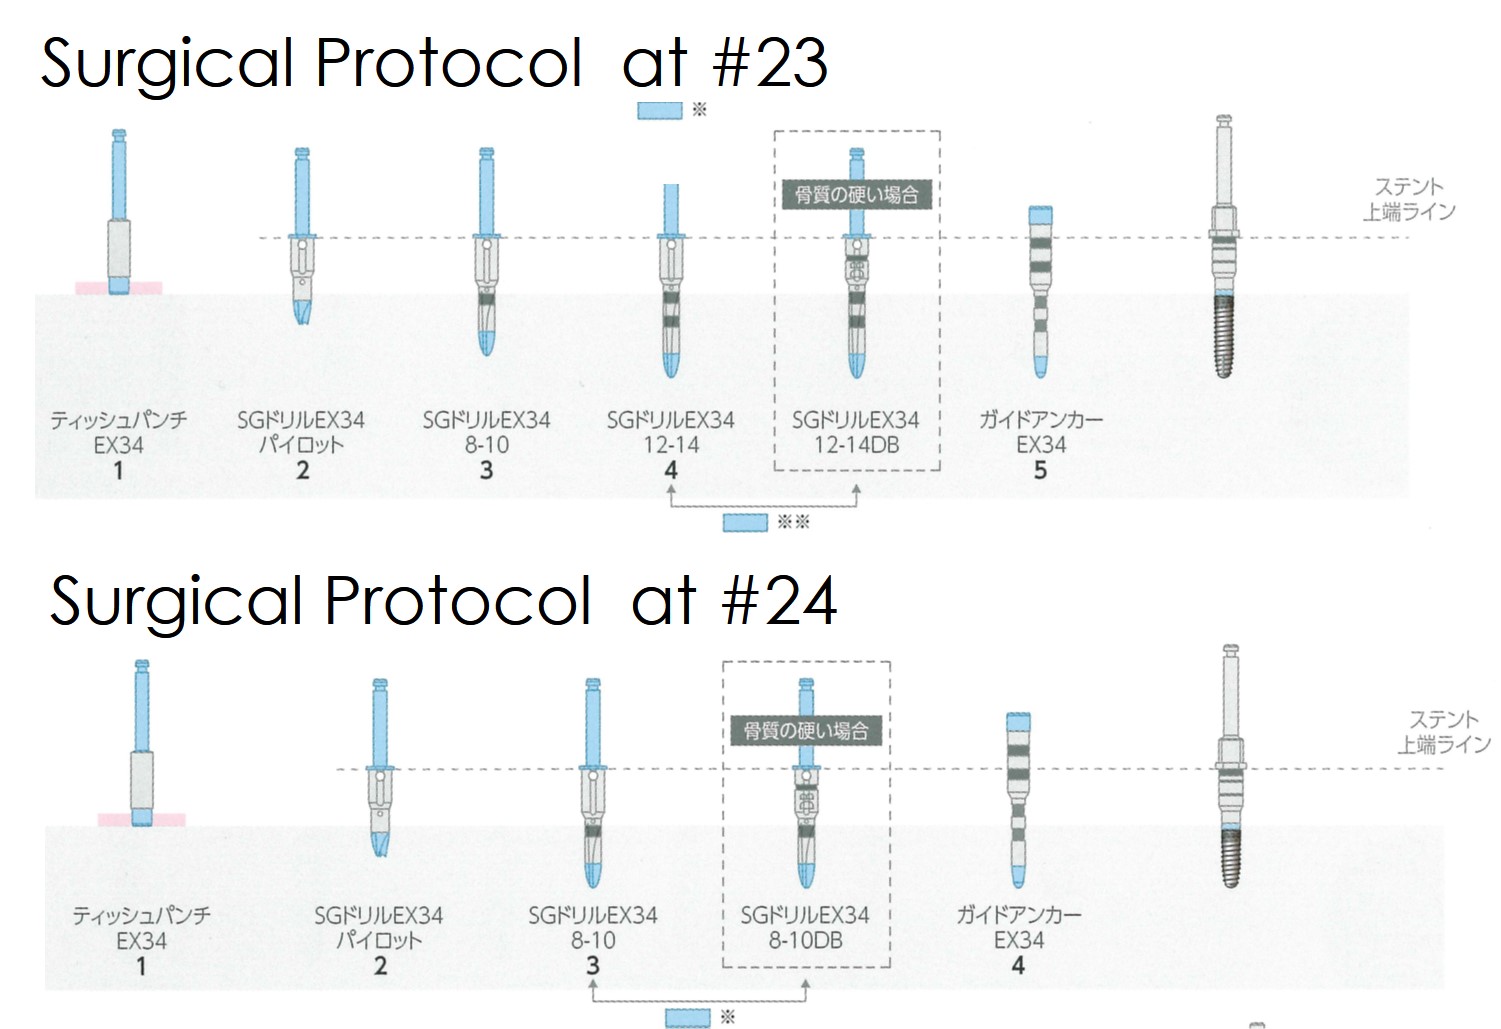
They are the drill protocols sent by iCAT. Make sure it proceeds according to the instruction.
iCATから送られてくるドリルプロトコル。手順に沿って進めていく。
Extraction of deciduous tooth
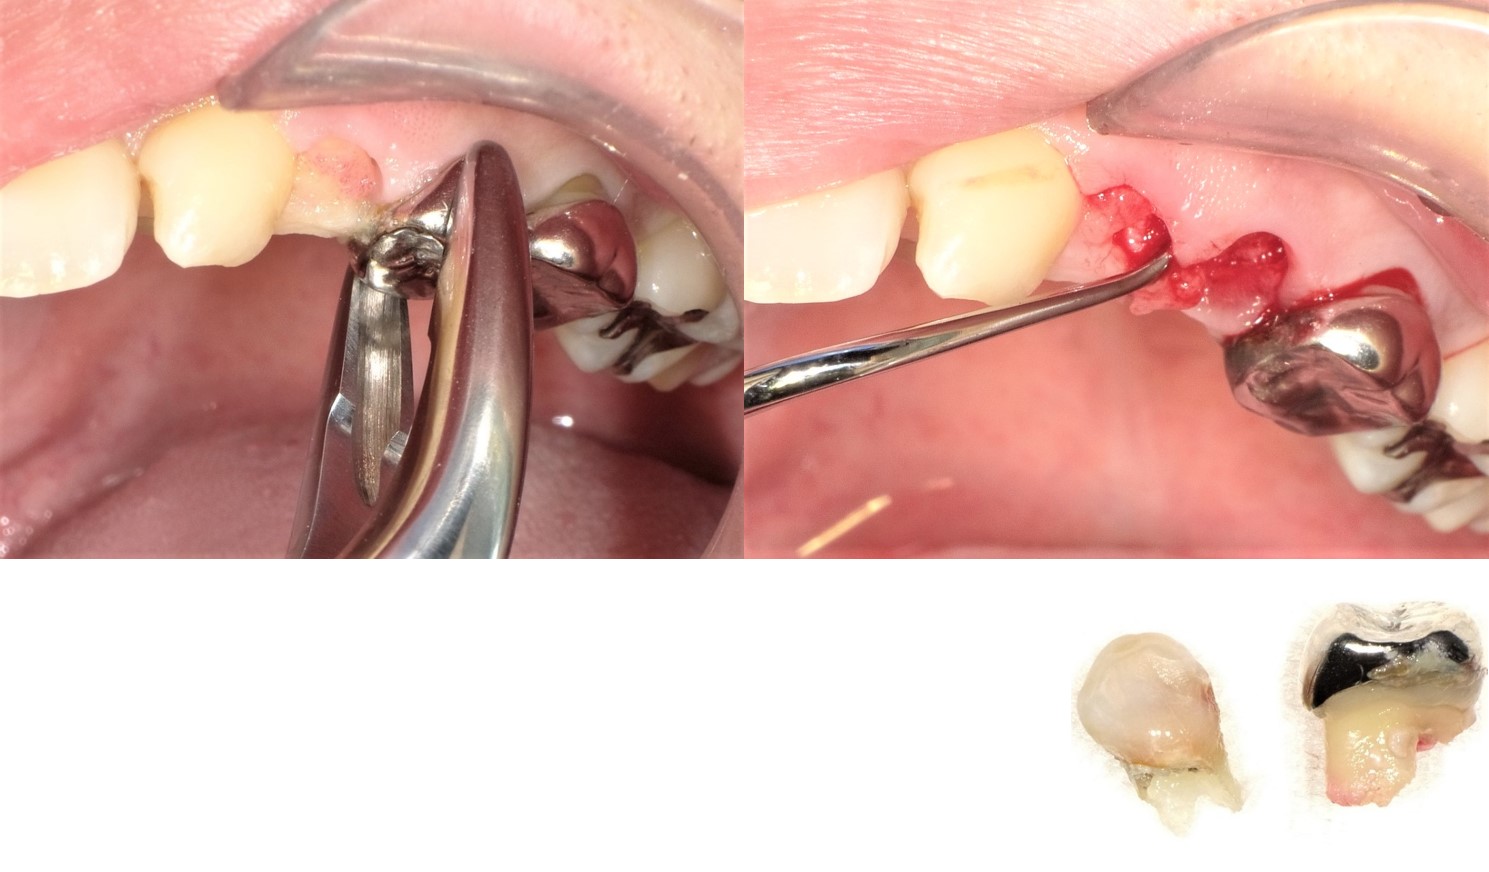
Firstly I extract the teeth.
There is no infection focus but removal such as granulation tissue should be carefully done.
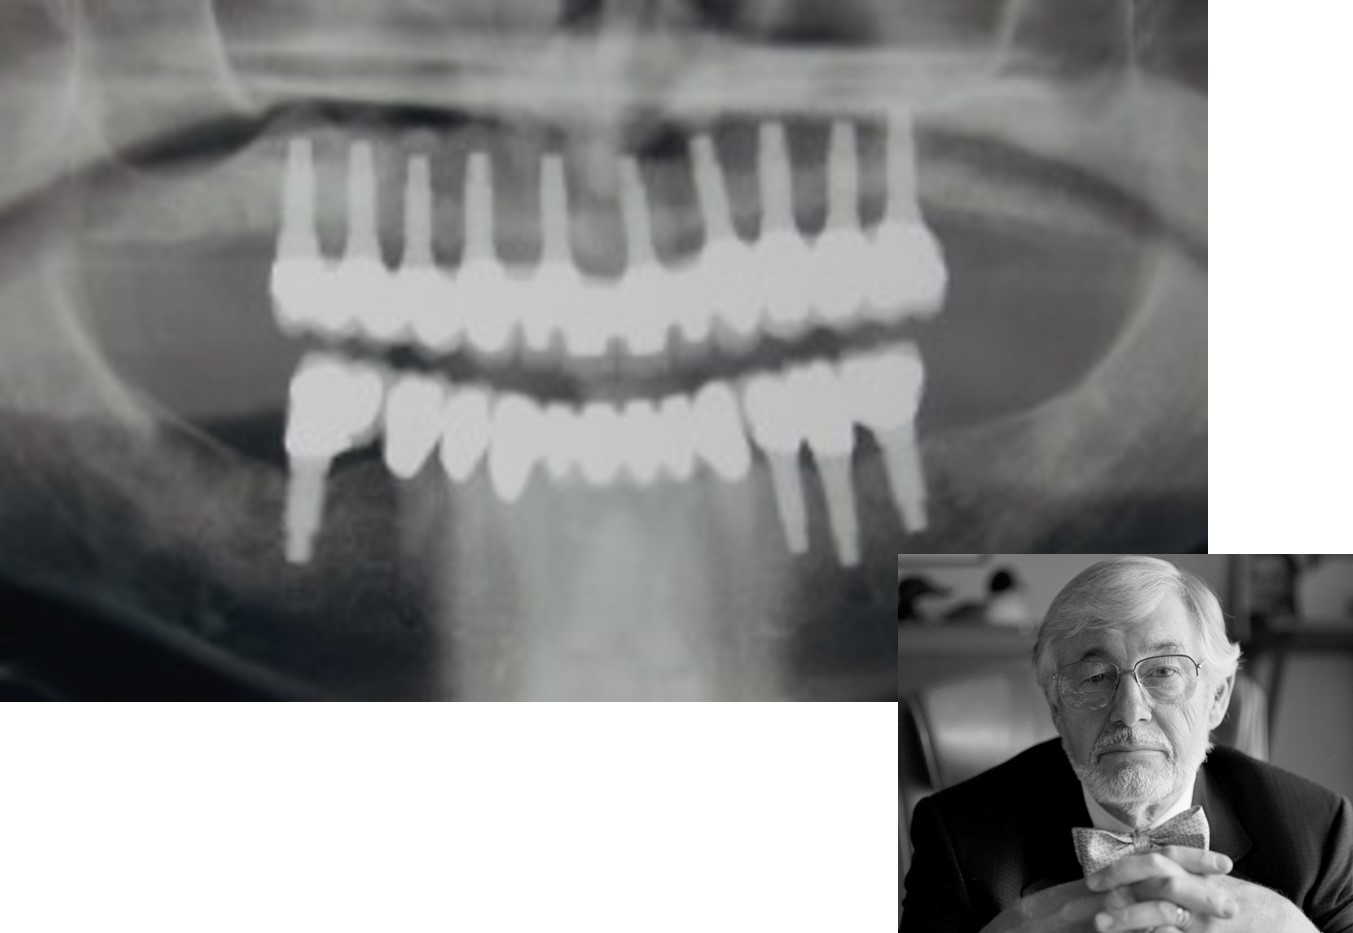
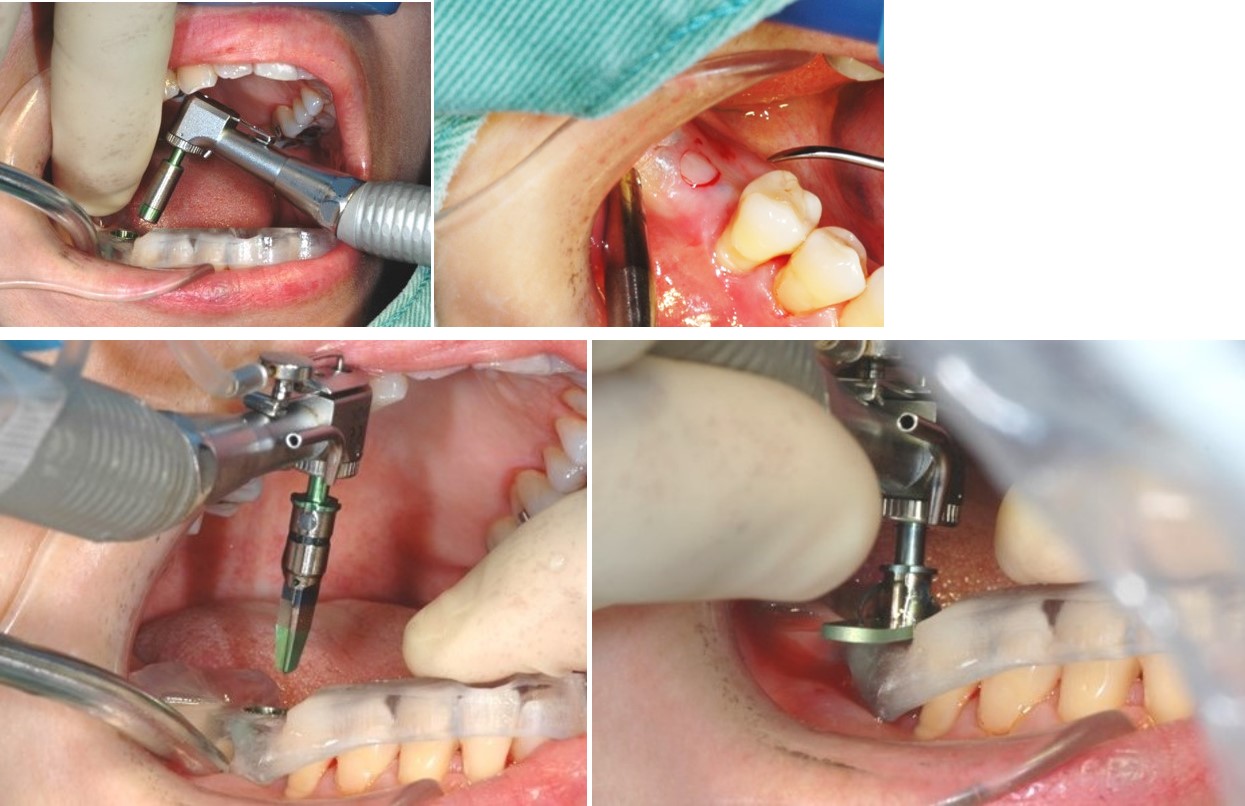
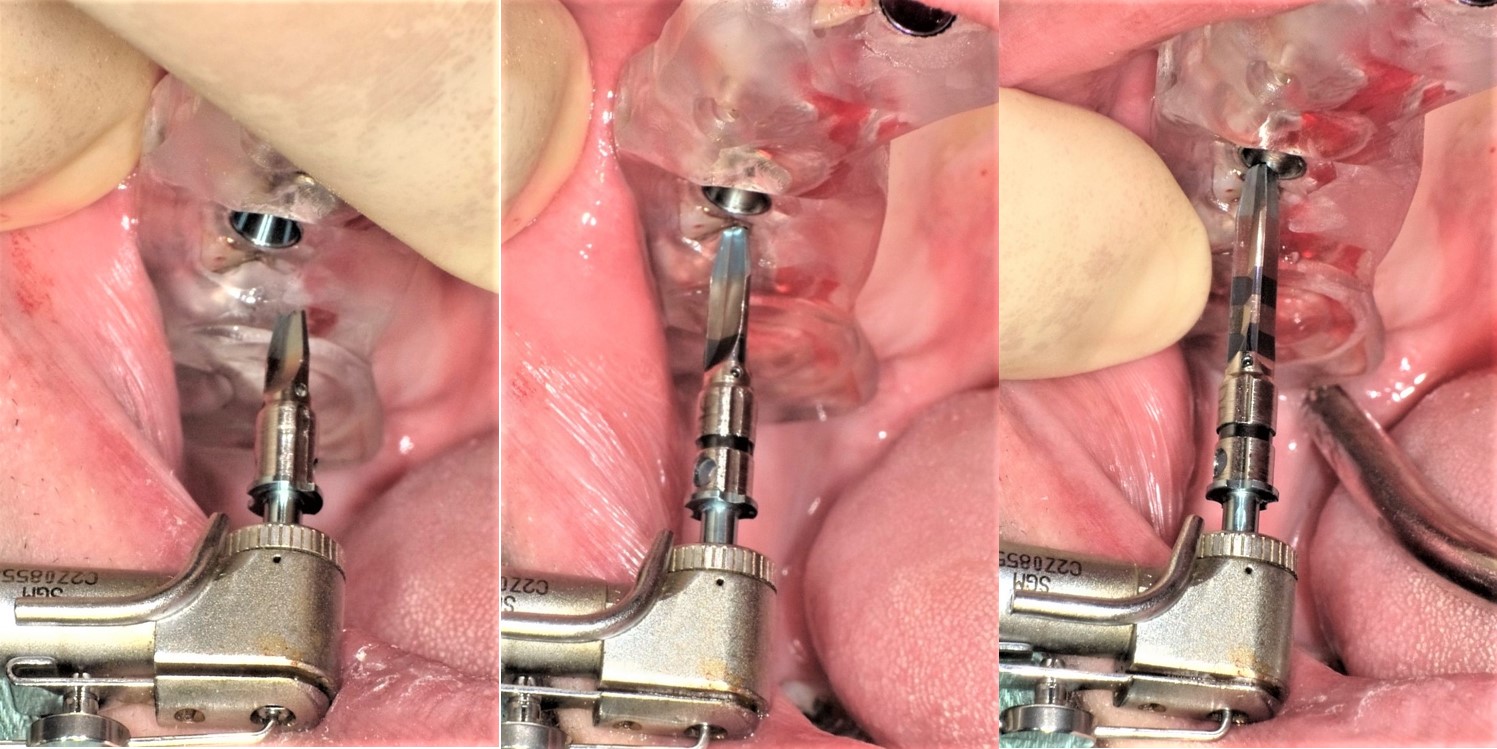
Start Drill
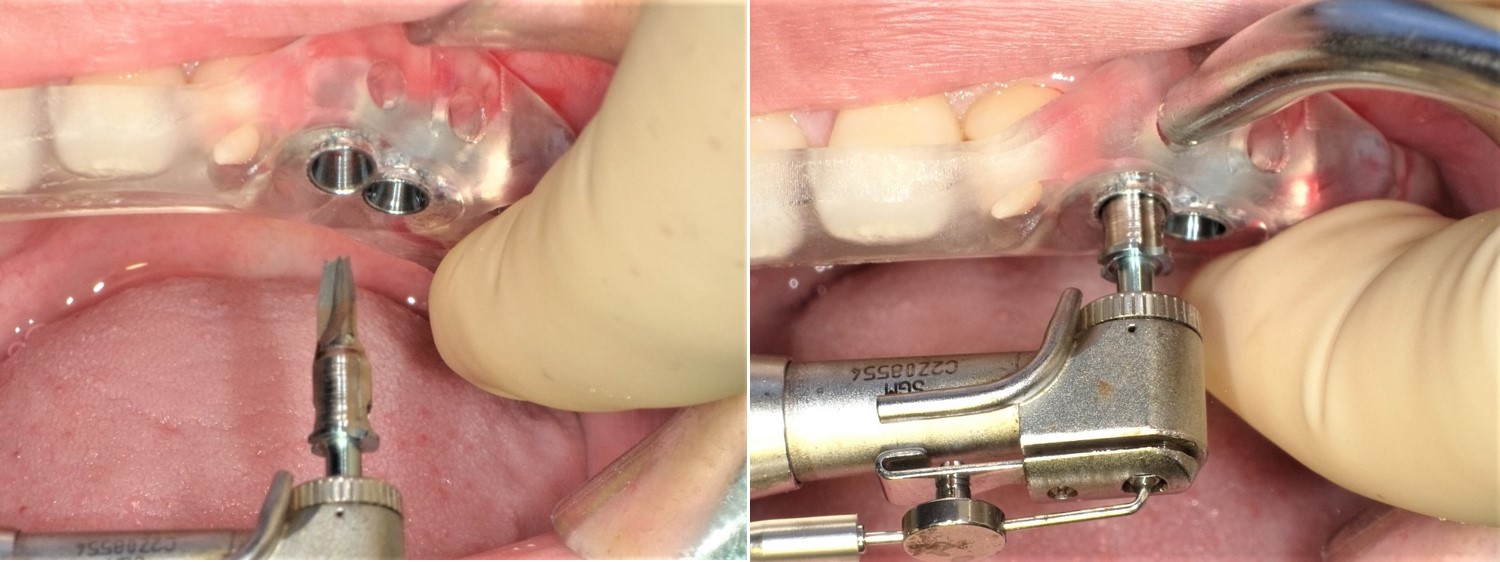
The slide showed the drilling with Kyocera’s pilot drill with iCAT’s Landmark Guide Tekishin Surgical Guide
Final Drill
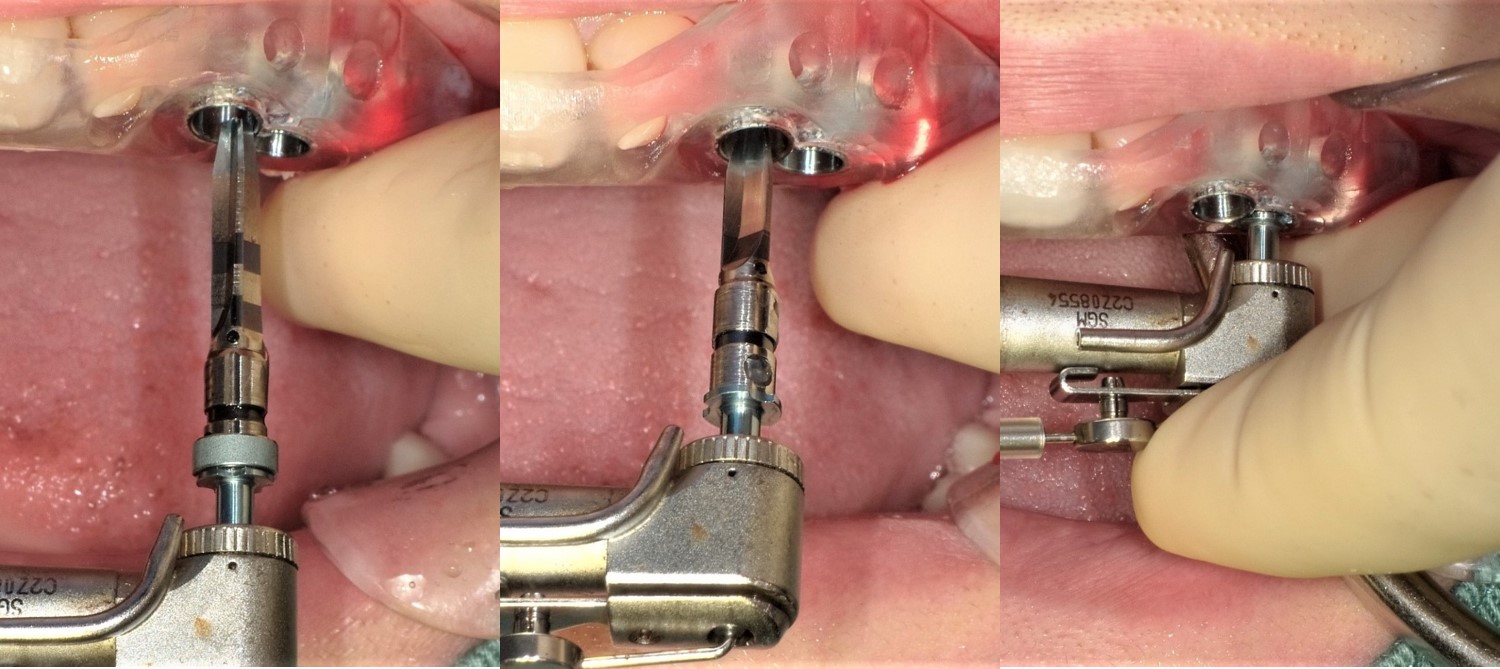
Placement position and direction of the drilling can be controlled by using the guide. I chose to drill with 800rpm.
In some cases, like the picture on the right, I drill while the engine head is pressed.
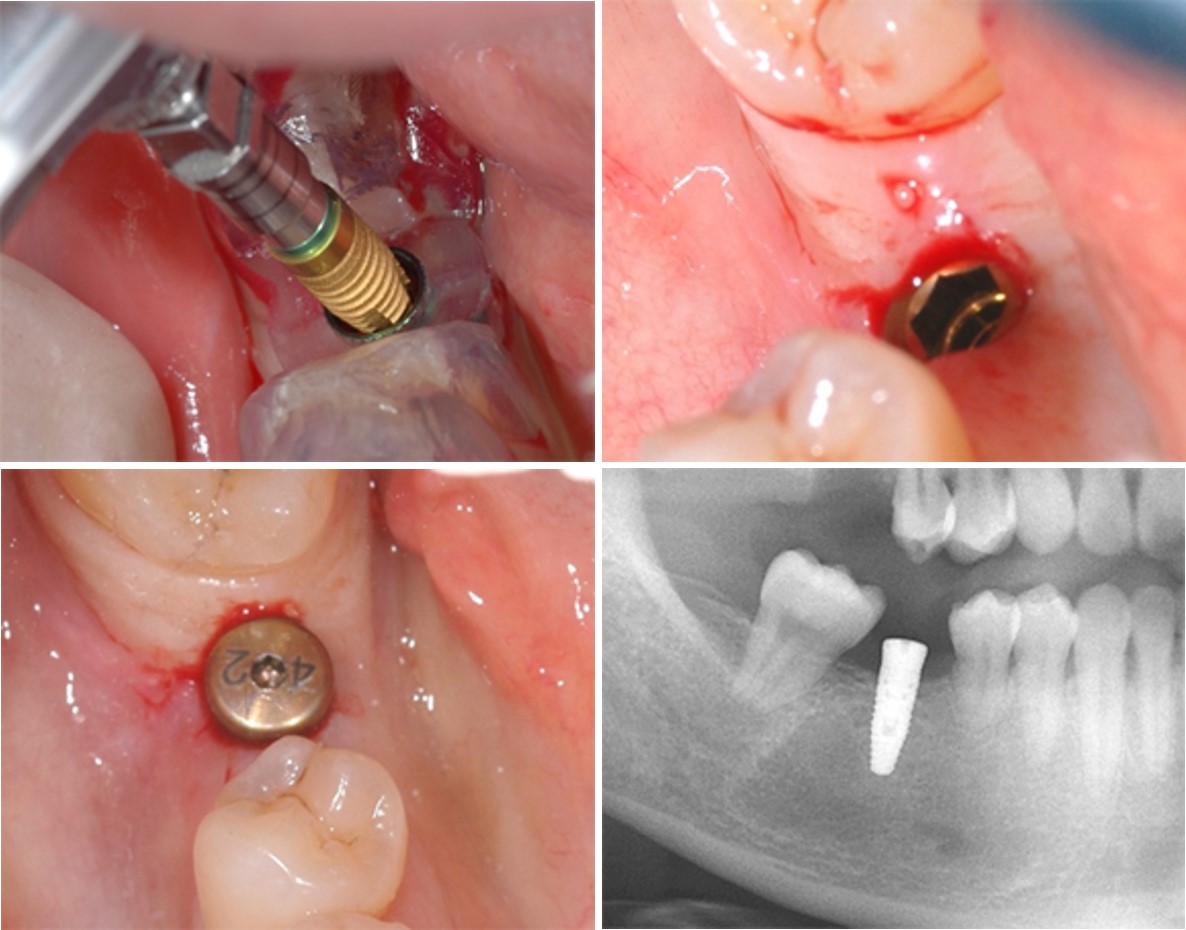
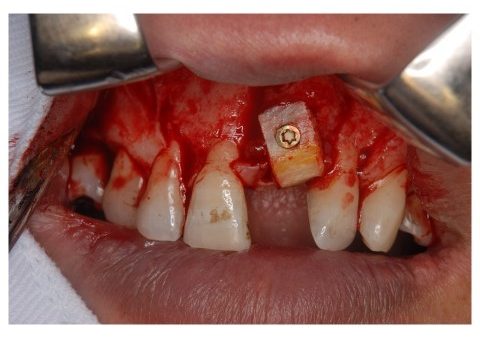
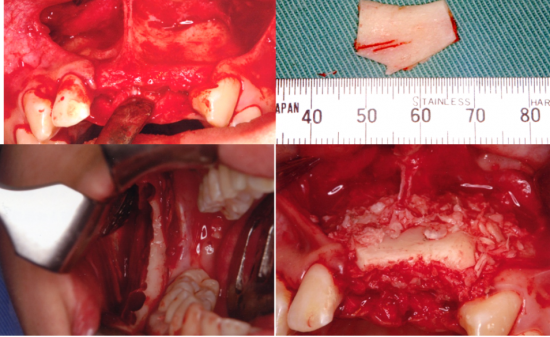
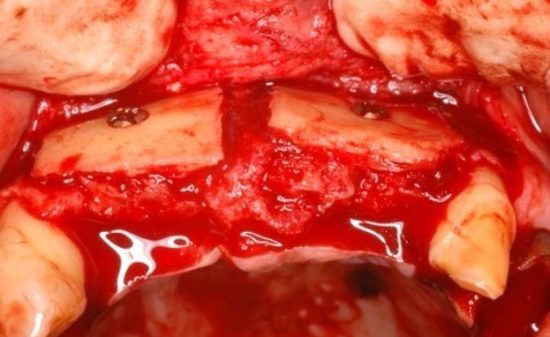
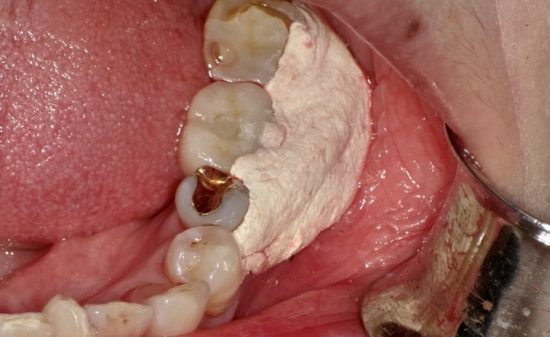
Implant insertion
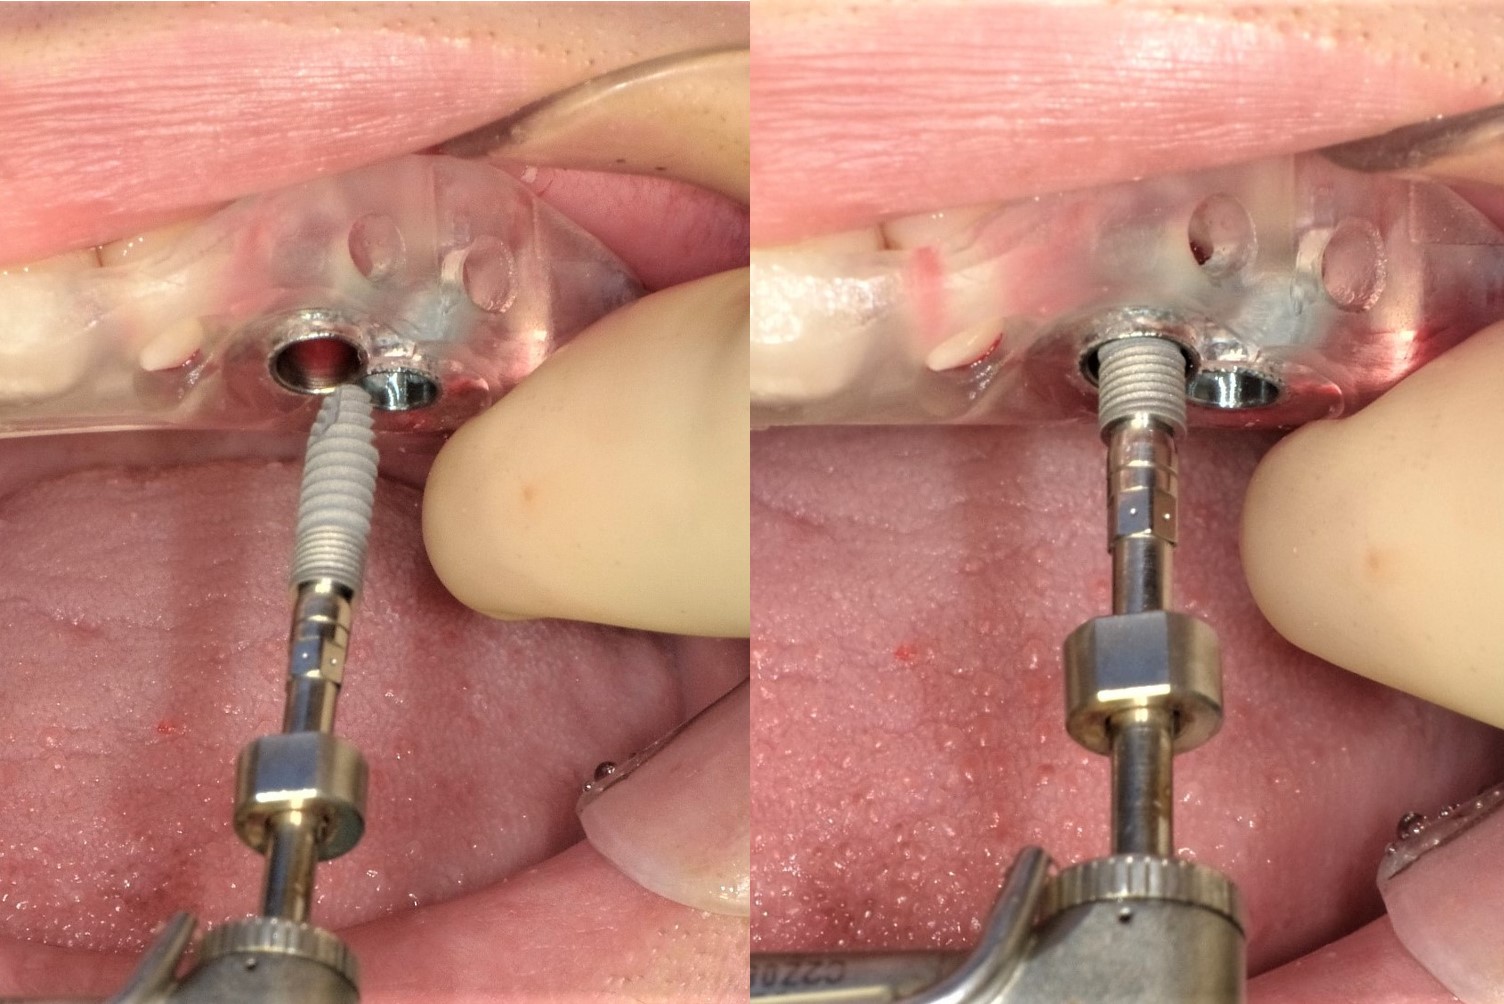
implant was inserted after implant cavity was formed.
Following the guidance of the Surgical Guide, the implant was inserted to the planned position with correct direction.
There is a stopper so that the implant would not be inserted too deep.
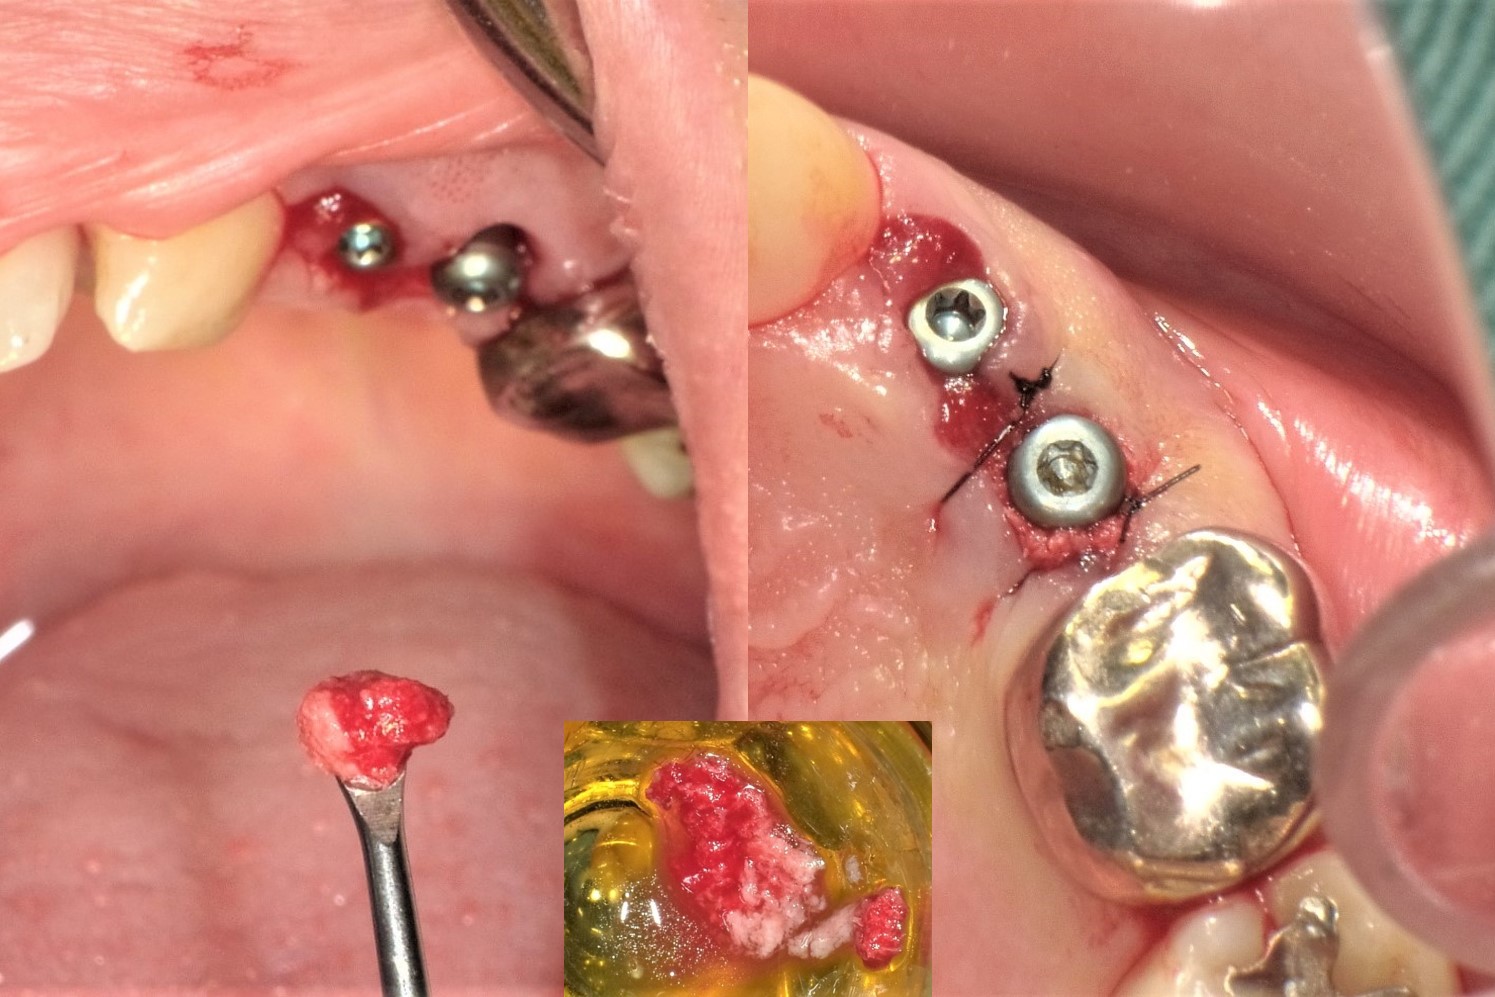
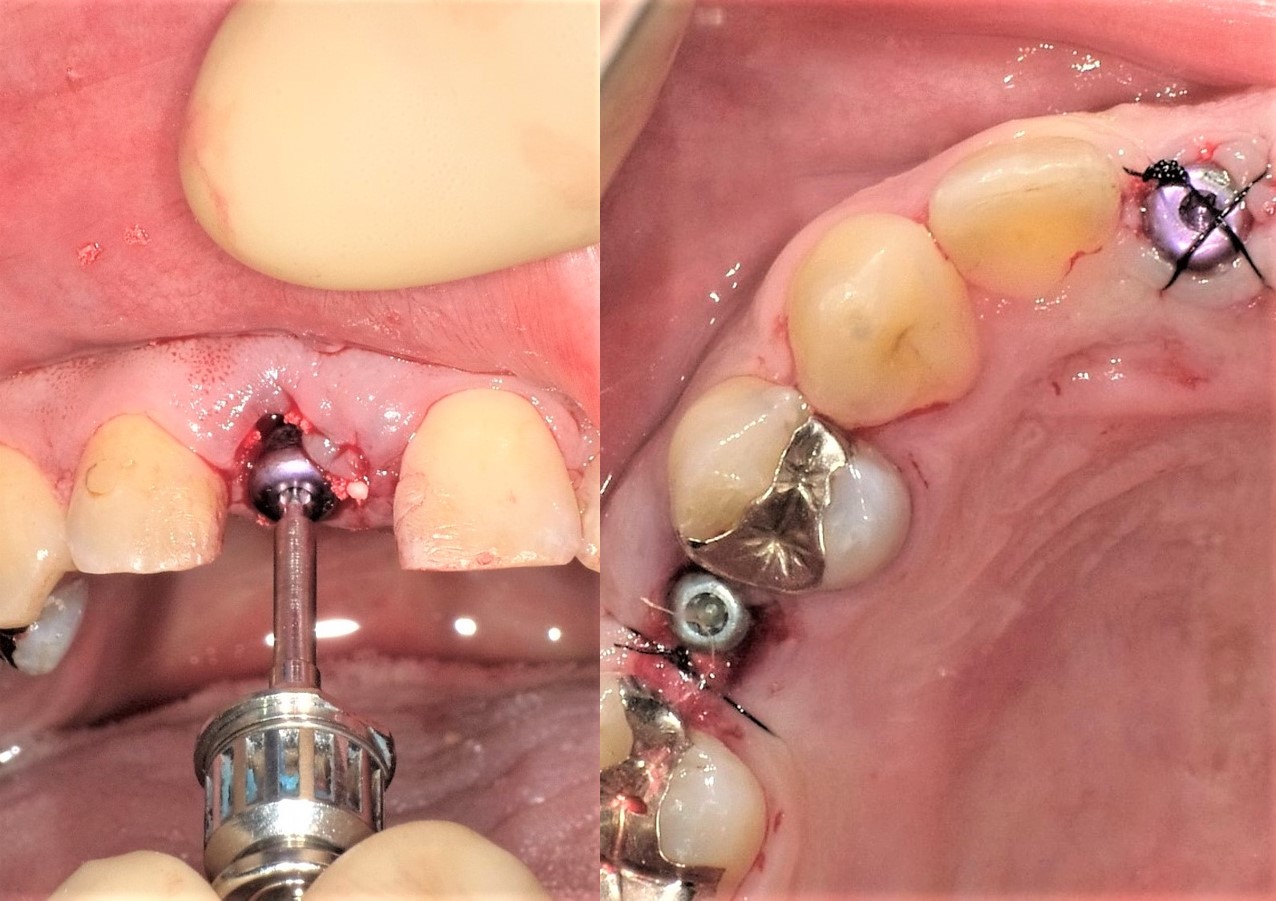
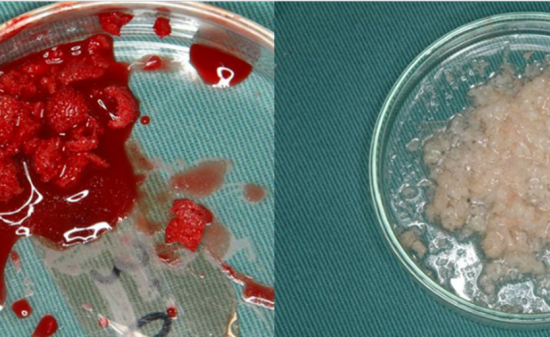
Once the implants were inserted, healing caps were placed. Before the suture, patient’s own bone that I got from the drilling was
placed around the healing caps. I am not expecting that it directly generates the bone but I still do this in many cases because
if more bone can be generated by protecting implant surroundings with patient’s own bone, I think it can contribute to good prognosis.
Actually,this is another advantageod TEKISHIN system,drilling takes us good autogeneous bone from Patients.
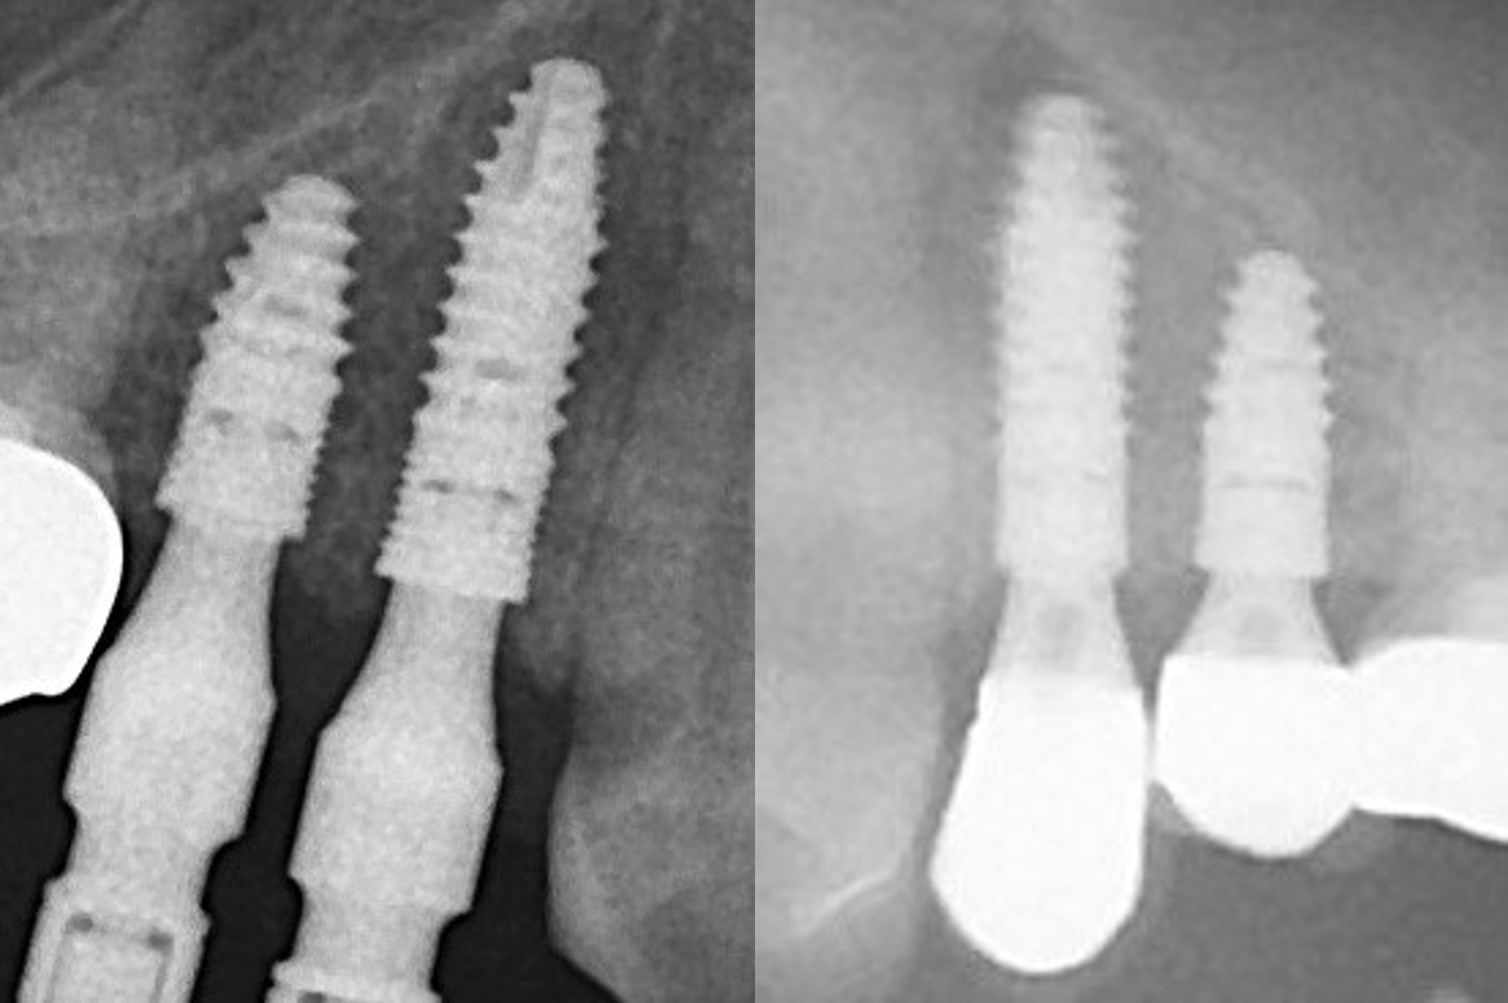
Operation time was 28mins
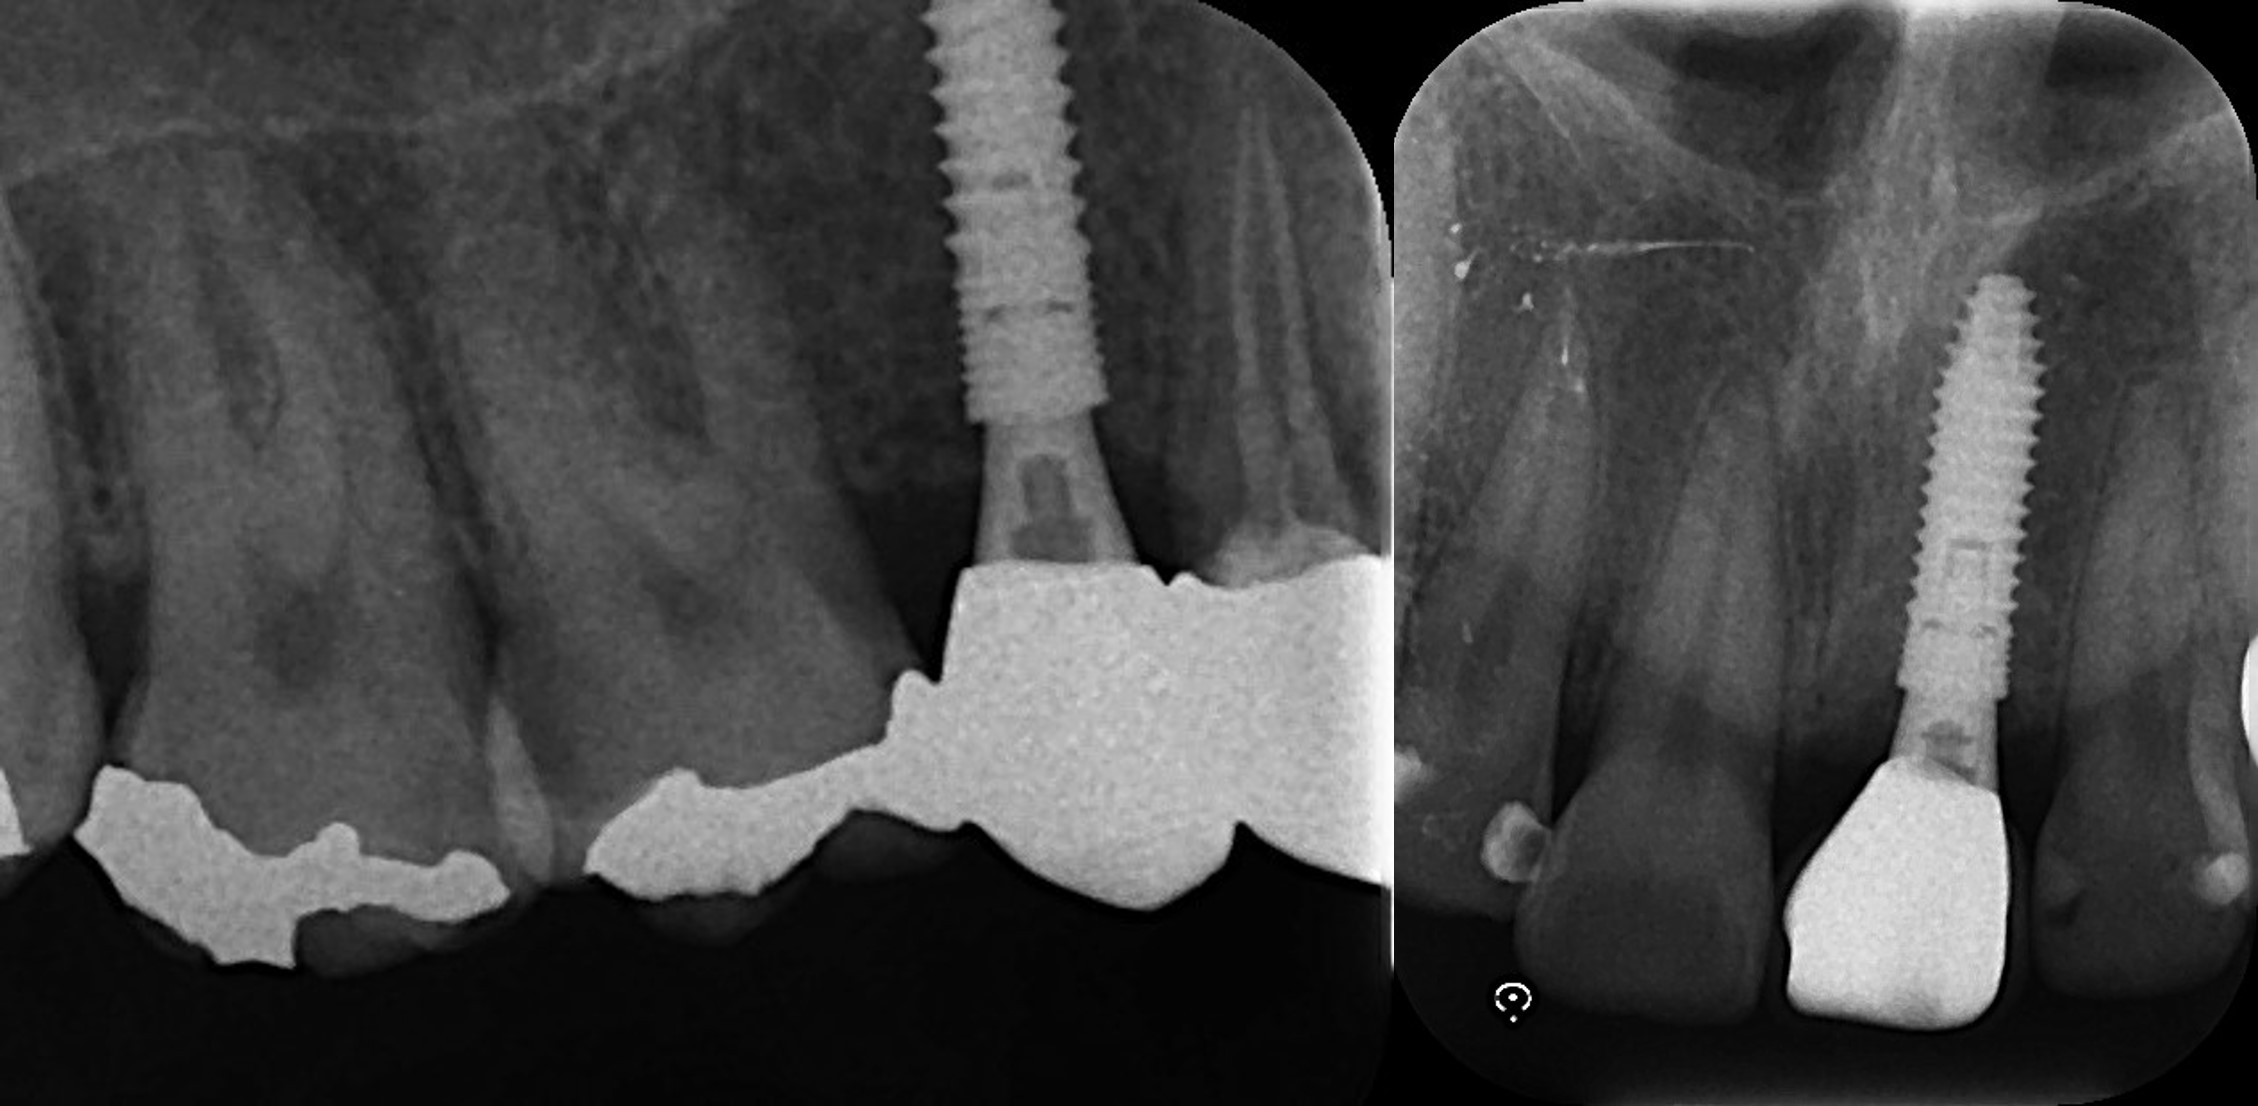
Post-op check with panoramic X-P. Placement positions were as planned. Distances to the adjacent teeth and sinus were all kept appropriate. With free-handed surgery or simple surgical guide, accurate placement can never be achieved.
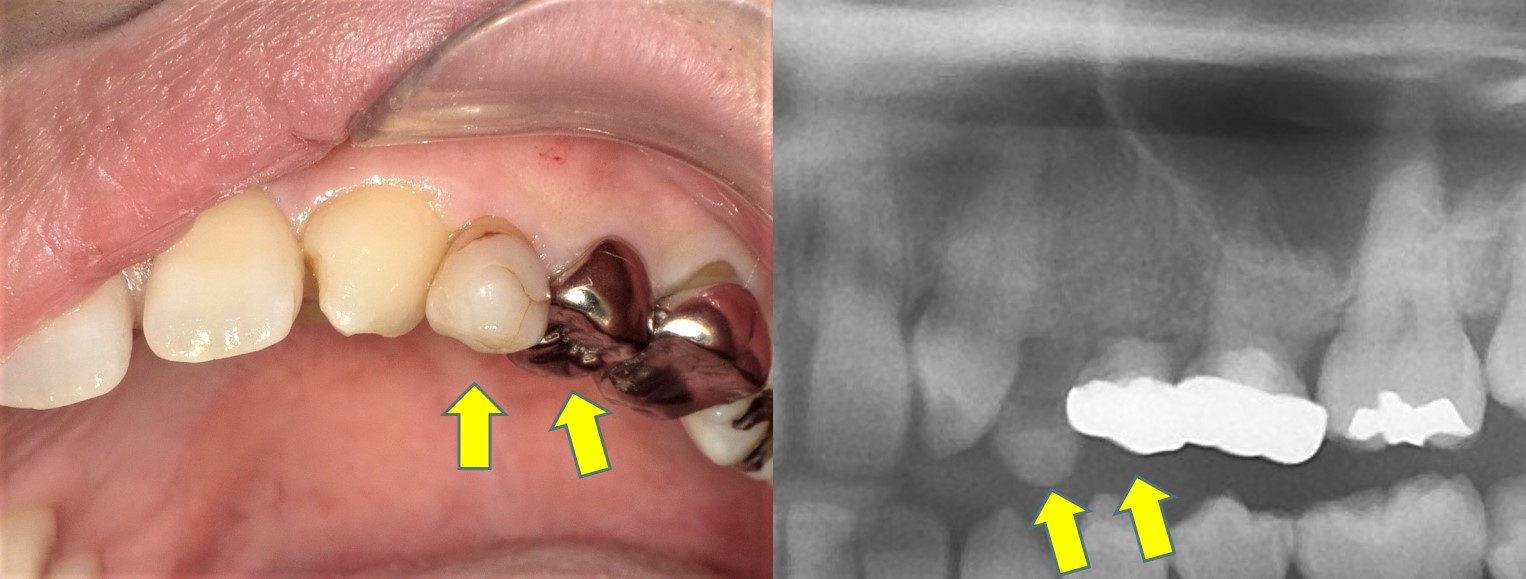
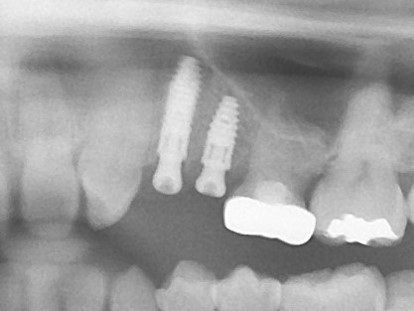
They are the dental X-Ray image and panoramic X-P when taking the impression and when attaching the final prosthesis
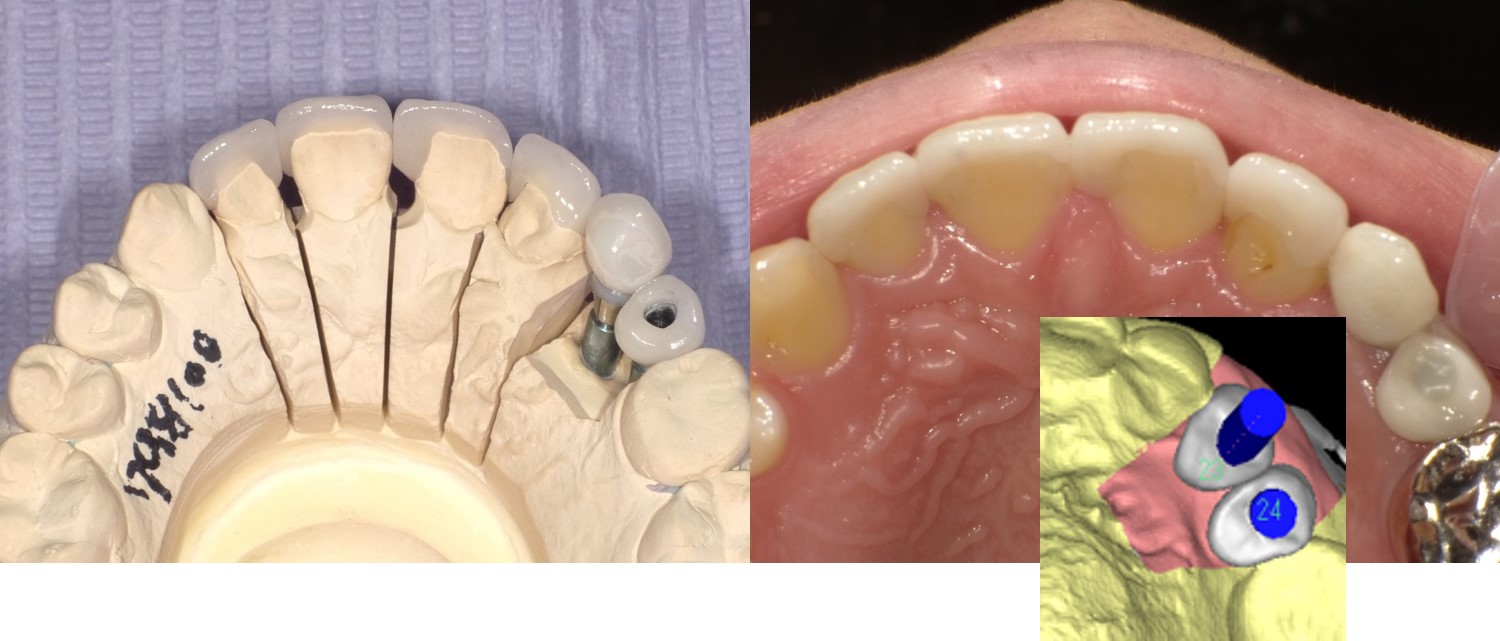
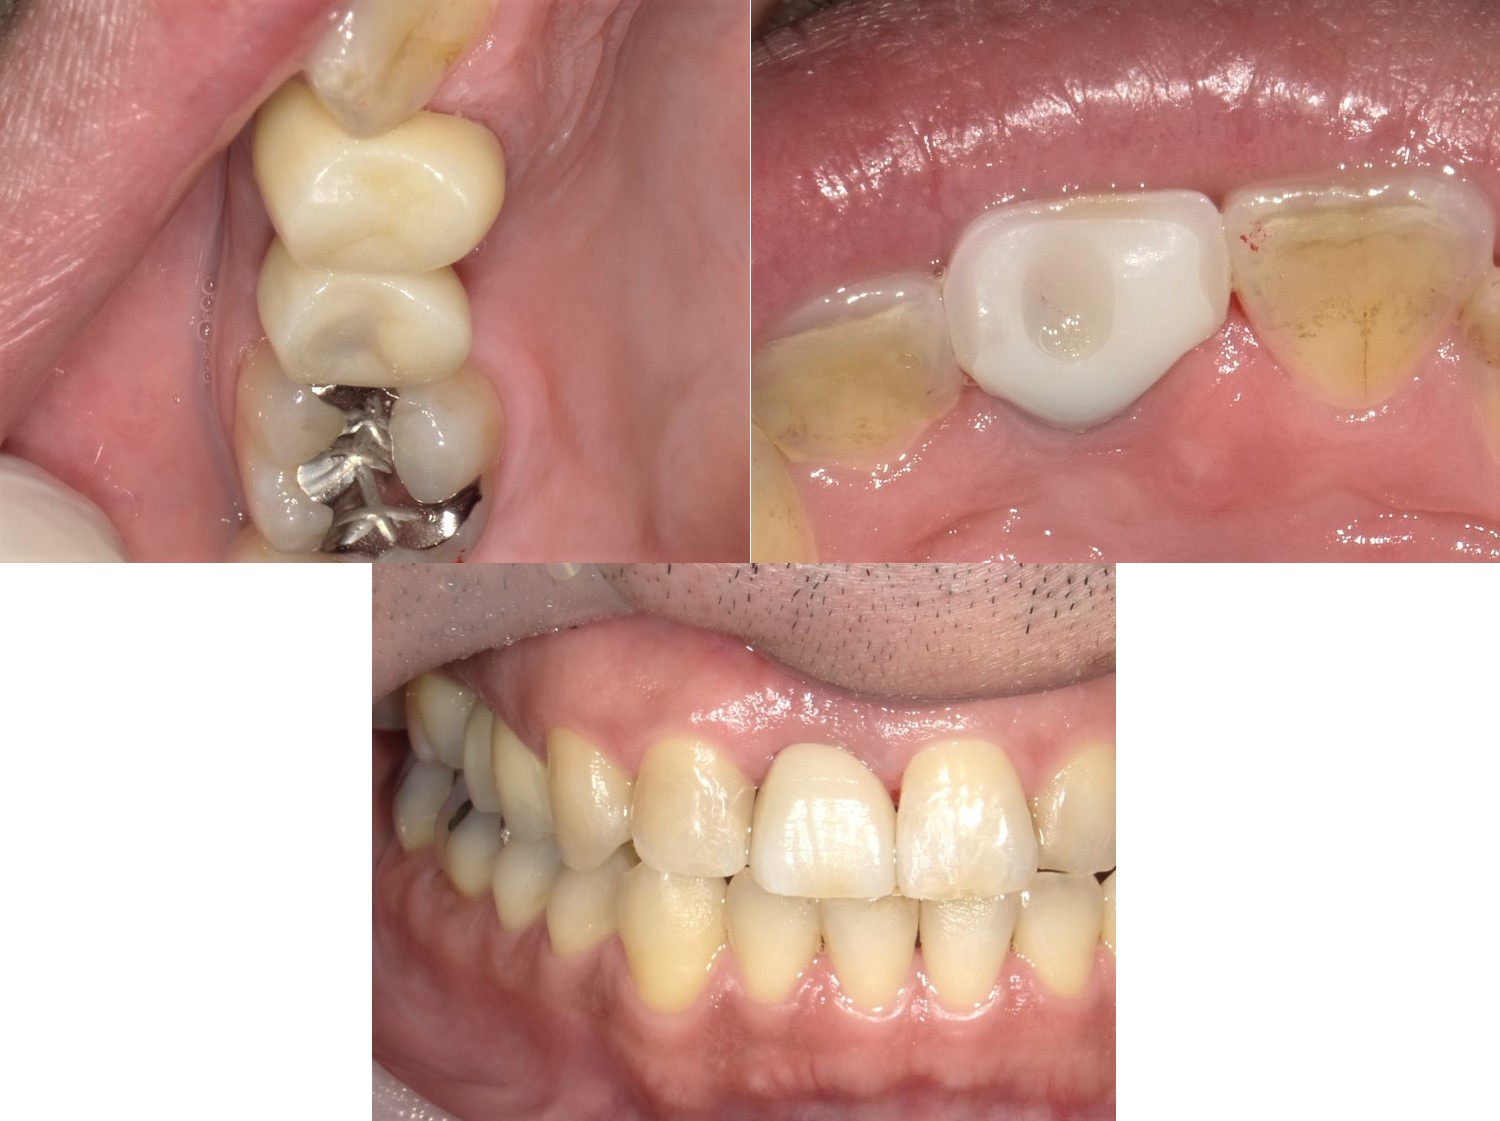
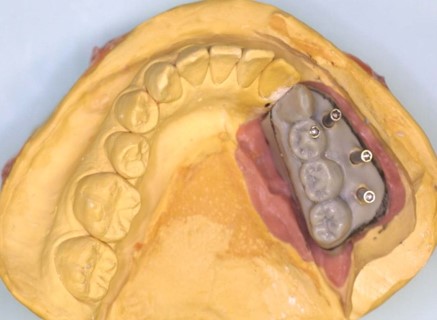
Final prosthesis on the model and final prosthesis attached to the patient’s teeth
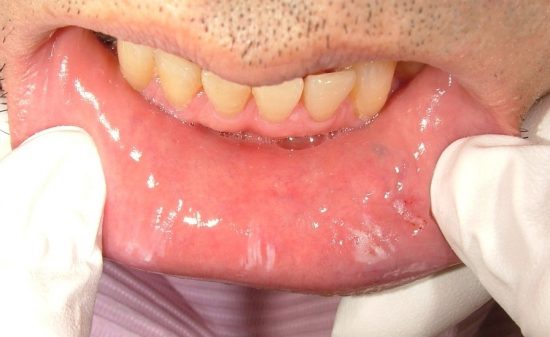
Here are the pictures of final prosthesis intraoral.
Aterior tooth was treated with laminate veneer was attached.
Bofroe implant operation we must consult the final appearance of the intraoral treatment with patients .
Pleasenotisfy the simulation was done not only the implant stracture, but also laminate veneer.
Patient’s appearance was significantly improved and both patient and her family were very happy.
Case 2
Here is the next case.
Dental crown of right side central incisor was collapsed. Also confirmed little pus discharge and absorption of alveolar bone on labial side.
On the right second premolar, there was a fracture of tooth root.

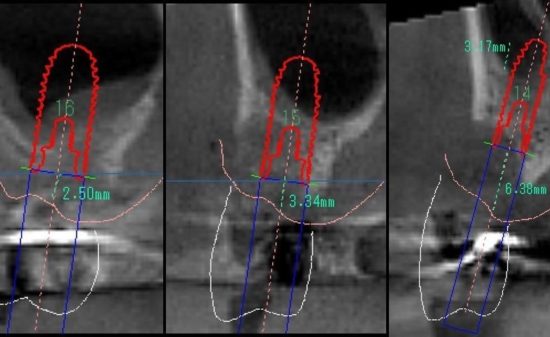
Simulation for operation
CT images and simulation. 16mm length implant was chosen to get bi-cortical support.
Bone density color scale was only as reference.
Simulation for operation
CT images and simulation 14mm length implant was chosen to get bi-cortical support.
Extraction of tooth avoiding alveolar none damage

This is the extraction of the second molar
Drilling for implant insertion : Start → Final
The picture on the left shows the first drilling step with FINESIA drill using iCAT’s Tekishin Surgical Guide.
Implant insertion

Implant insertion on the formed implant cavity. With the stopper, placement depth can be kept appropriately.
When inserting the implant, I could see the Surgical Guide led the implant body to be inserted to the appropriate position with correct direction.
The picture on the right is when the Surgical Guide was removed. State of the extraction socket along with the distance of the gap between
implant and existing bone and associated adjustment of depth are also important.
Drilling for implant insertion : Start → Final

In Free-handed surgery, the drill easily slips on the slope of palatal bone and axis of the implant cavity tends to be more palatal.
Even with the Surgical Guide, it could happen so need to be very careful on this 3 step.
Implant insertion

Implant is inserted after forming the implant cavity.
The picture on the right is immediately after the insertion. Exam the gap between the implant body and the remaining bone and
remaining alveolar bone with probes and decide whether or not to use bone argumentation and membrane.
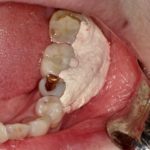
Bone augmentation

Artificial bones are filled in the gap between labial bone and the implant body for bone regeneration.
However, in this case, part of the periosteum might have been lost so KOKEN Tissue Guide was used
in order to induce periosteum-like tissue between artificial bone and gingival connective tissue.
Healing Abudment and Suture
Pictures after putting the healing abutment. Even if you do not open the flap, can tell the bone level using dental probe.
Suture so as not to leak bone substitute material from implant placement position.
For the second premolar, it is sometimes sutured after applying TERUPLUG or SPONGEL to prevent bone substitute material from being leaked.
Duration of the procedure was 23mins

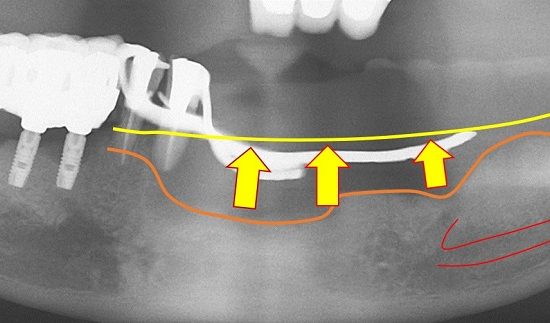
Post-op check with panoramic X-P. Placement positions were as planned
Dental X-P when placing the final prosthesis
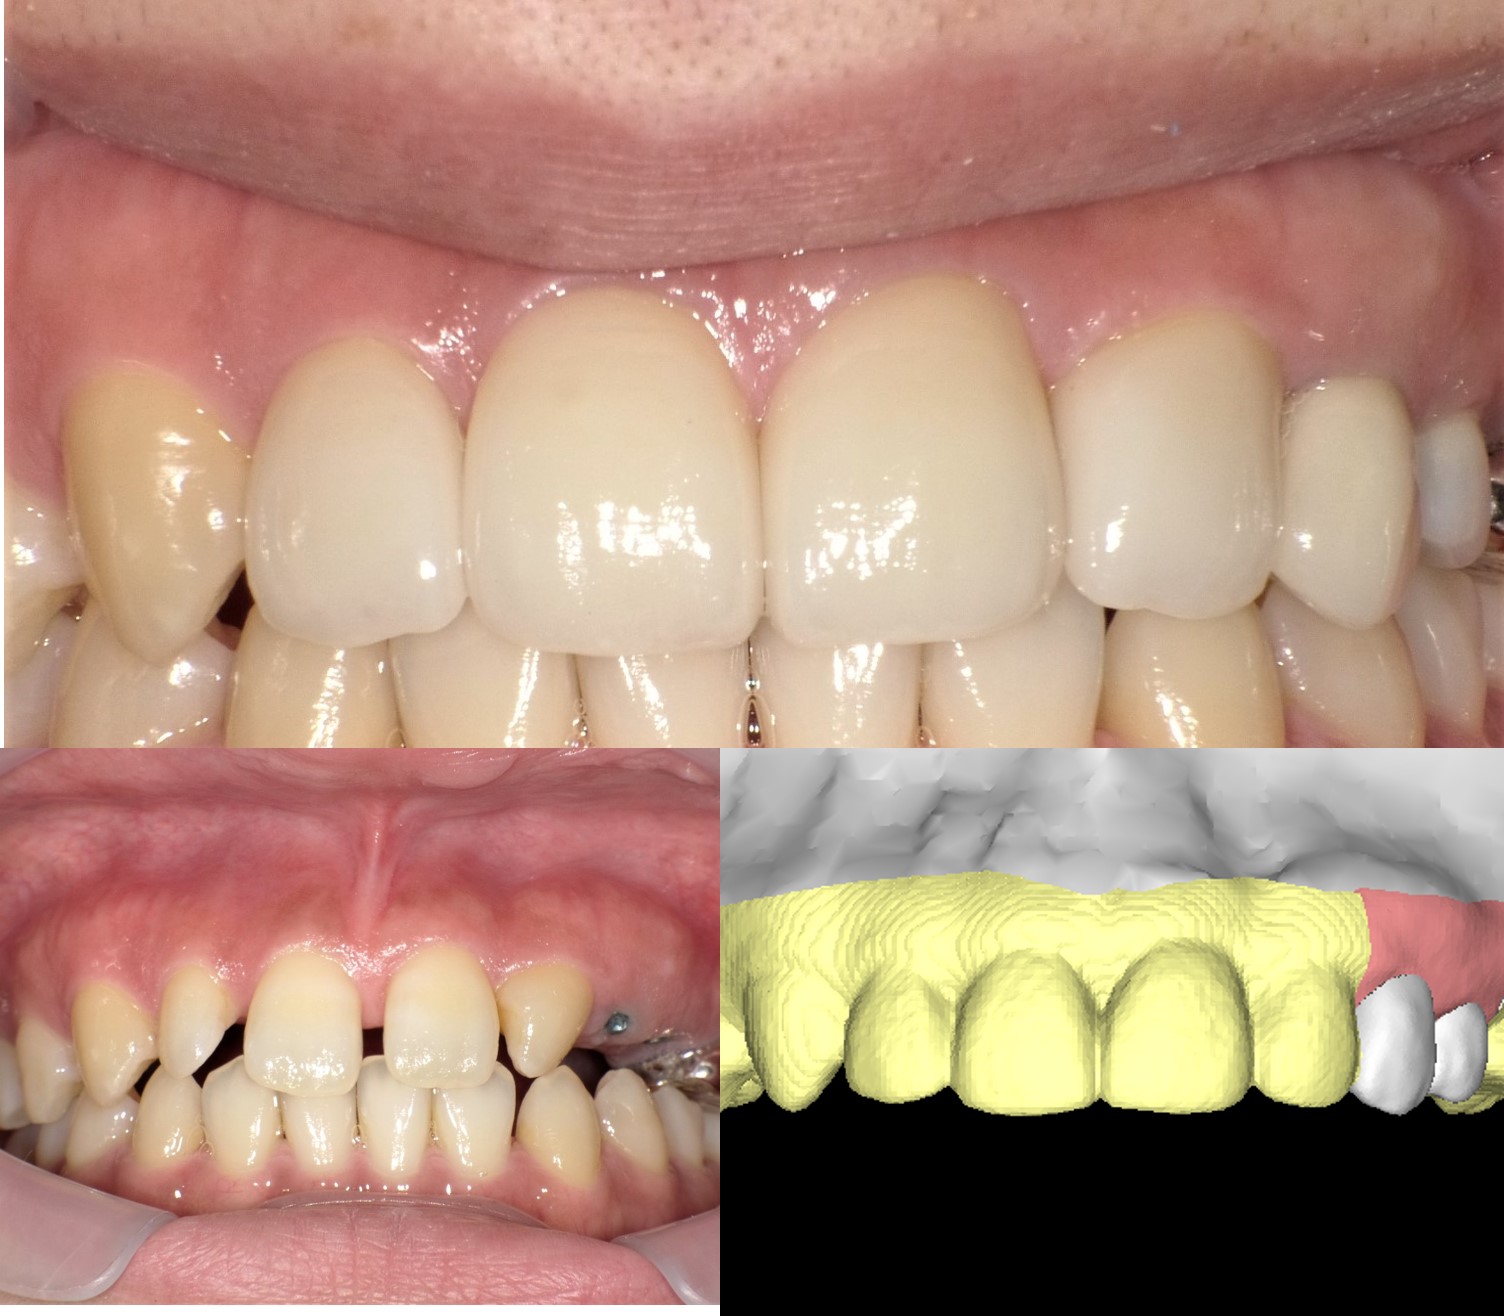
Final prosthesis placed on the patient’s teeth.
Another picture of final prosthesis placed on the patient’s teeth.
Thank you for your attention, I hope this lecture will help your clinical procedure from tomorrow.
Do your best for your patients like your family without anxious and with confidence


 PAGE TOP